N3 Pro
N3 Pro - User Guide - First-time setup
Congratulations on receiving your new pair of N3 Pro! Use this guide to learn about pairing N3 Pro with your preferred device, charging the batteries, and restoring the earphones to their factory settings.
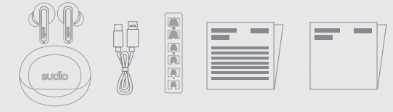
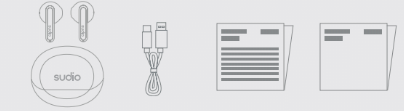
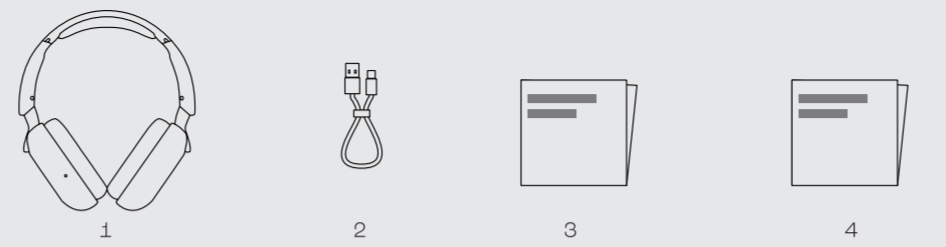
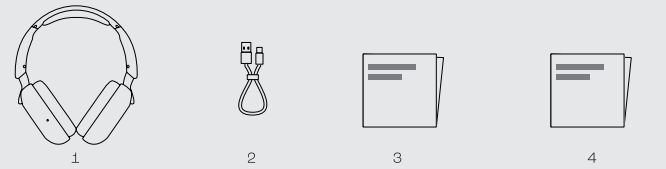
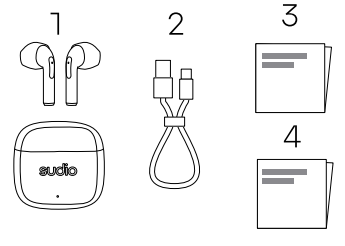
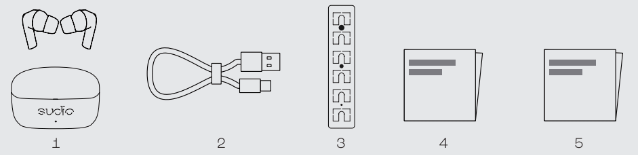
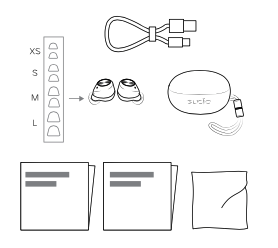
What's included in the box

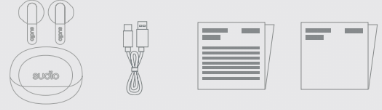
- N3 Pro wireless earphones and charging case
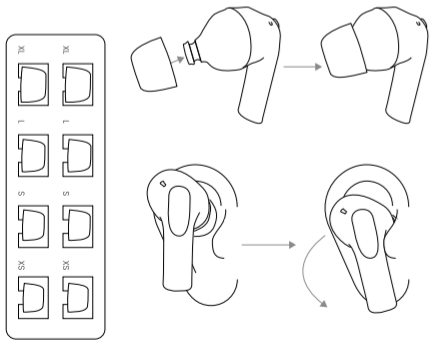
- Interchangeable ear tips in five different sizes: XS, S, M, L & XL
- Type-C USB-cable
- Owners manual
- Warnings Manual
Before getting started
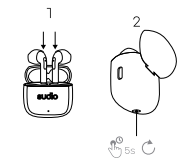
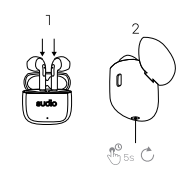
⚠️ Sudio N3 Pro is delivered with a protective film covering the charging connectors between the earbuds and charging case. The film needs to be removed in order for the earbuds to charge/turn on.
The earbuds will likely have some existing battery charge, however it is recommended to fully charge N3 Pro before using it for the first time.
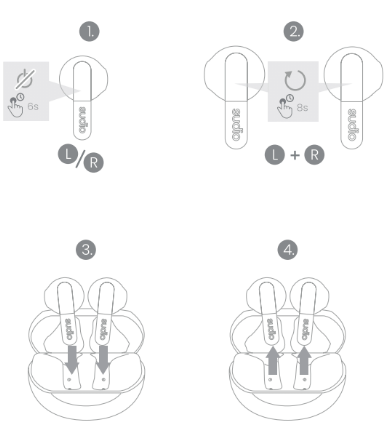
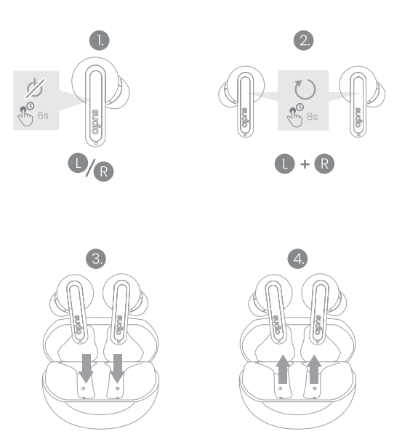
Turning N3 Pro on or off
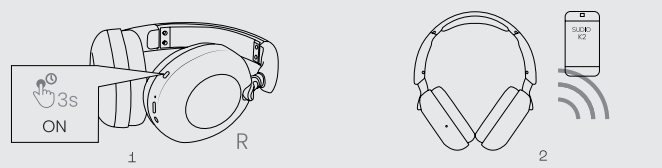
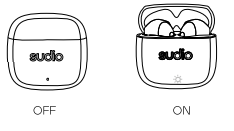
N3 Pro powers up as soon as the earbuds are removed from the charging case, as indicated by the LED lights on the earbuds and the audio feedback 🔈 Power On.
Similarly, N3 Pro is turned off when placing the earbuds back into the case.
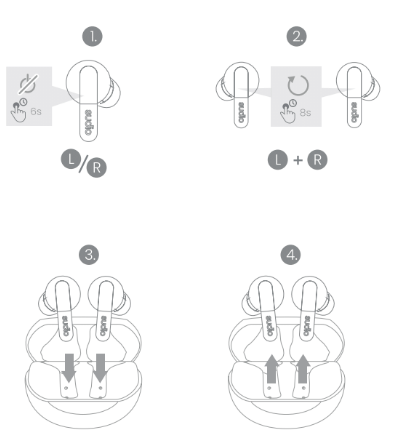
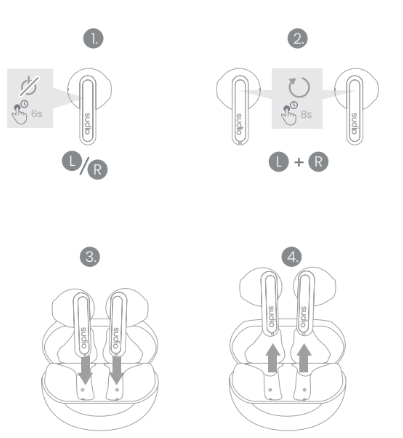
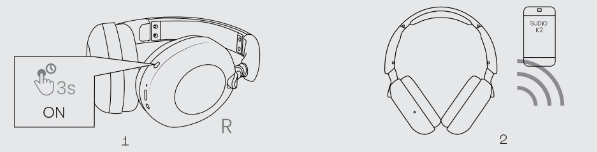
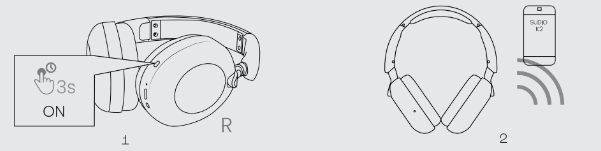
You can also use the touch controls to power the earbuds on or off. Do this by holding the touch control for 7 seconds on either earbud.
Pairing with a device
Jump to complete guide
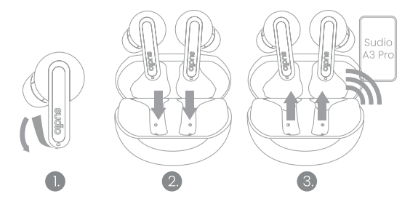
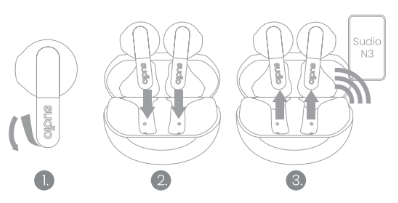
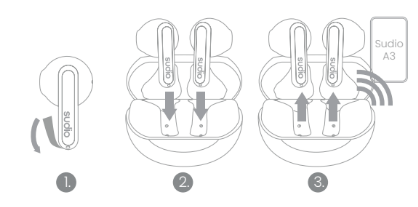
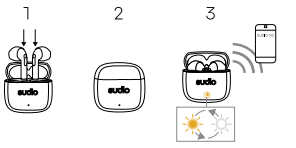
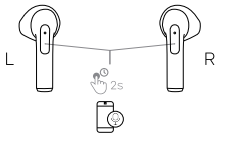
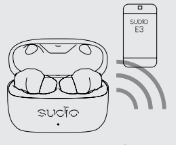
N3 Pro enters pairing mode when the earbuds are removed from the charging case. Open the Bluetooth settings on your device and wait for N3 Pro and the device to locate each other, then select Sudio N3 Pro when it appears in the list. You will hear 🔈 Pairing Successful, confirming that the devices are paired with each other!
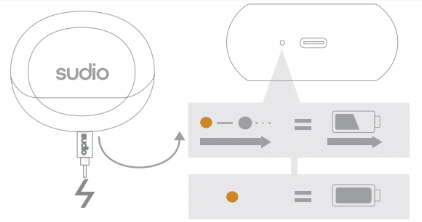
Charging the batteries
Jump to complete guide
There are three batteries in total on N3 Pro; one in the charging case and one in each earbud.
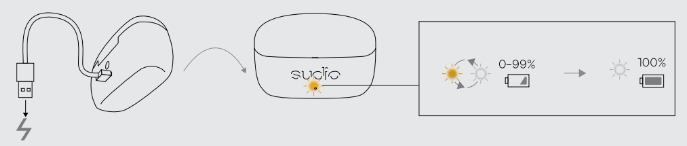
The N3 Pro earbuds charge their batteries automatically when placed inside the charging case, this is indicated by the LED lights on the earbuds. Make sure to first remove the protective film which is covering the charging connectors.
The N3 Pro case is charged with a Type-C USB-cable. When the case is charging, you will see a light on the front of the charging case. It is recommended to use the Sudio Type-C USB-cable that's included in the package, but the charging case may be compatible with third-party Type-C USB-cables as well.
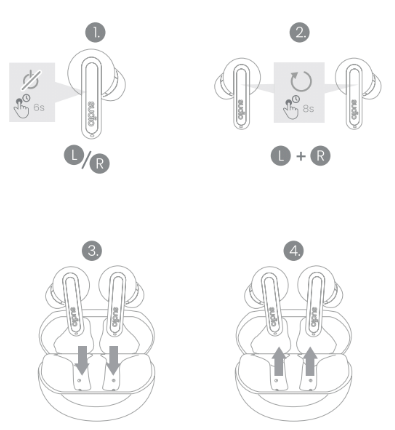
Restoring N3 Pro to factory settings
Jump to complete guide
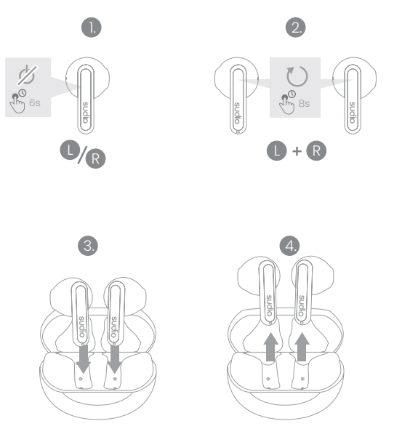
If N3 Pro starts behaving unexpectedly, or if you wish to remove the connection between N3 Pro and the connected device, you can perform a factory reset to restore your Sudio N3 Pro to its original settings. This will reset the connection between your paired devices, as well as the connection between the two earbuds.
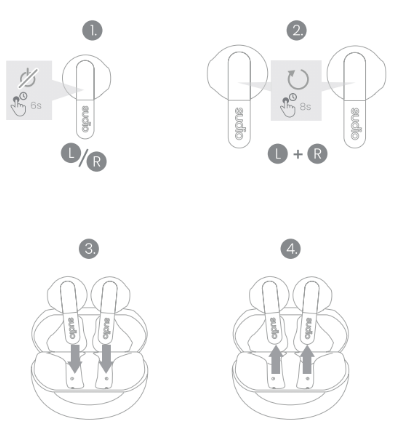
1. Take the earbuds out of the charging case.
2. Wait until the earbuds have gone through the voice feedback saying: 🔈 Ready to pair, find your Sudio product in the Bluetooth list of your device. Then proceed with pressing and holding both touch points on the earbuds for 6-8 seconds until you hear Power Off.
3. Release the touch button, and once again hold both touch points of the earbuds for 6-8 seconds until you hear 3 clicking sounds.
4. Leave the earbuds out of the case and close to one another for 20 seconds so they can resynchronize.
5. Place the earbuds back in the case and close the lid and allow 1 minute before using the earphones again.
N3 Pro - User guide - Connectivity & Pairing
N3 Pro powers up as soon as the earbuds are removed from the charging case, as indicated by the audio feedback 🔈 Power On. When pairing N3 Pro for the first time, you hear 🔈 On followed by 🔈 Ready to pair, find your Sudio product in the Bluetooth list of your device.
⚠️ Sudio N3 Pro is delivered with a protective film covering the charging connectors between the earbuds and charging case. The film needs to be removed in order for the earbuds to power on.
Pairing N3 Pro with a device
- Remove the N3 Pro earbuds from the charging case and fit them inside your ears.
- Go into the Bluetooth settings on your device. The N3 Pro earbud LED lights are flashing white while scanning for available devices.
- For iOS (iPhone), go to the Settings app and select Bluetooth.
- For Android, go to the Settings app, then select Connections followed by Bluetooth.
- For Windows 10, click on the Start button, select Settings followed by Devices, and then Bluetooth and other devices.
- For macOS, go to the System Preferences app and select Bluetooth.
- Locate and select Sudio N3 Pro in the Bluetooth list on your device.
- When paired you will hear the audio feedback 🔈 Connected.
If N3 Pro has previously been paired with your preferred device, simply remove the earbuds from the charging case and they will automatically connect, so long as Bluetooth is activated on the device and N3 Pro has not been paired with a different device more recently.
Device compatibility
N3 Pro uses Bluetooth version 5.4 which is compatible with a wide range of Bluetooth devices. The paired device does not need to be the same version, but similar versions are more likely to maintain a strong connection.
Signal interference
Some wireless devices may interfere with each others' signals, such as WiFi-routers, smartwatches, other Bluetooth devices, etc. If they operate within the same frequency, you may experience interference such as dropped sound and glitching. The easiest way to locate the cause of interference is by maintaining one connection between devices at the same time or take your N3 Pro and connected device outdoors to see if the interference clears.
N3 Pro can be up to a maximum of 10 meters (32 ft) from the paired device, but the connection may break if they are blocked by walls or similar objects.
Pairing with multiple devices
N3 Pro can remember up to 10 devices and will pair automatically with the last used device.
It is possible to keep N3 Pro connected to several devices at the same time, such as a laptop and smartphone simultaneously, N3 Pro supports Multipoint connection.
You can quickly and easily switch between audio sources with your N3 Pro without having to manually disconnect and pair them to one device at a time. Multipoint helps to simplify the process of connecting, disconnecting, and reconnecting your N3 Pro every time you want to use them with a different device.
N3 Pro - User guide - Touch controls
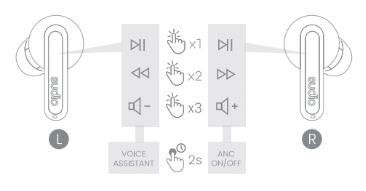
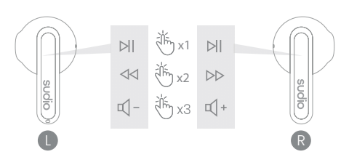
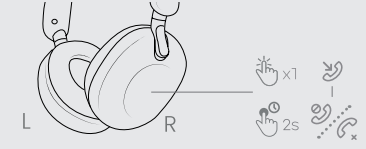
N3 Pro has a touch control button on each earbud that allows you to control certain features on your paired device.
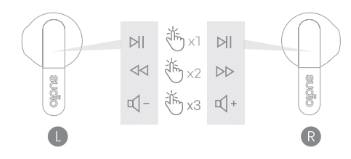
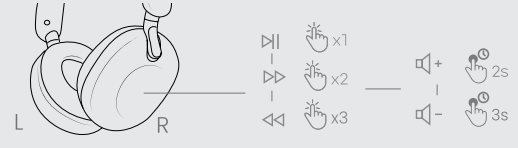
Music/video playback
- Touch once on either earbud (left or right) to play or pause
- Touch twice on the left earbud to rewind
- Touch twice on the right earbud to go forward
- Touch three times on the left earbud to decrease volume
- Touch three times on the right earbud to increase volume
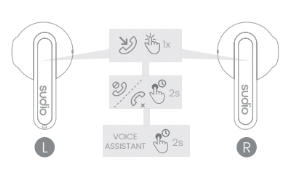
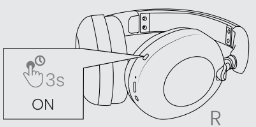
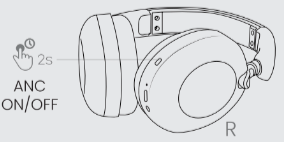
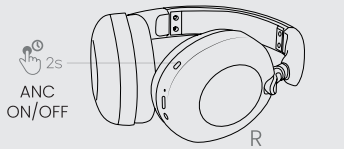
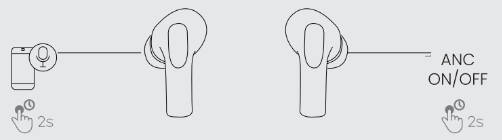
- Touch (hold) for two seconds on the right earbud to turn the ANC On/Off.
- Touch (hold) for two seconds on the left earbud to turn the voice assistant On/Off.
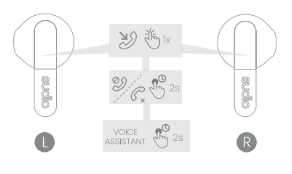
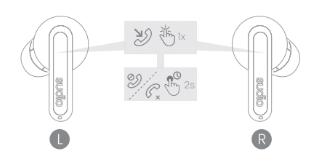
Incoming phone calls
- Touch once on either earbud (left or right) to accept a phone call
- Touch (hold) for two seconds on either earbud (left or right) to reject or end a phone call*
*It's not possible to end a call using the touch controls while using third-party conference software due to different software protocols.
Power
N3 Pro powers on and off automatically when the earbuds are taken out or put back inside the case. However, you can also control this without using the charging case.
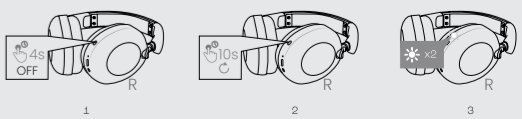
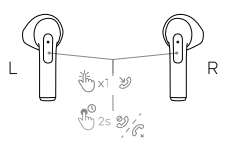
- Press (hold) for six seconds on either earbud to power off both earbuds (🔈 Power Off).
- Press (hold) for six seconds on either earbud to power on the single earbud(🔈 Power On).
N3 Pro - User guide - Factory reset
If N3 Pro starts behaving unexpectedly, or if you wish to remove the connection between N3 Pro and the connected device, you can perform a factory reset to restore your Sudio N3 Pro to its original settings. This will reset the connection between your paired devices, as well as the connection between the two earbuds.
1. Take the earbuds out of the charging case.
2. Wait until the earbuds have gone through the voice feedback saying: 🔈 Ready to pair, find your Sudio product in the Bluetooth list of your device. Then proceed with pressing and holding both touch points on the earbuds for 6-8 seconds until you hear Power Off.
3. Release the touch button, and once again hold both touch points of the earbuds for 6-8 seconds until you hear 3 clicking sounds.
4. Leave the earbuds out of the case and close to one another for 20 seconds so they can resynchronize.
5. Place the earbuds back in the case and close the lid and allow 1 minute before using the earphones again.
When you hear 🔈 Ready to pair, find your Sudio product in the Bluetooth list of your device, proceed to pair them with your Bluetooth device.
N3 Pro - User guide - Battery levels and management
N3 Pro has three built-in batteries; one inside the charging case and one in each earbud. The battery inside the case is used to charge the earbuds, while the included Type-C USB-cable is used to charge the case.
Charging and play times
The earbuds can be used for approximately 5 hours on one charge, with up to 25 hours in total before the case needs to be recharged.
Each battery takes approximately 90 minutes to fully charge.
Charging methods
The N3 Pro case can be charged with a Type-C USB-cable, wireless charging is not supported. We recommend using the Sudio cable included in the package, however, other third-party Type-C USB-cables may be compatible too.
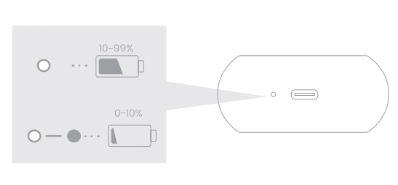
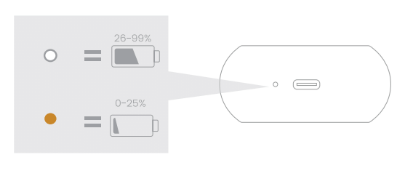
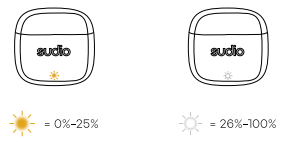
Battery level indicators
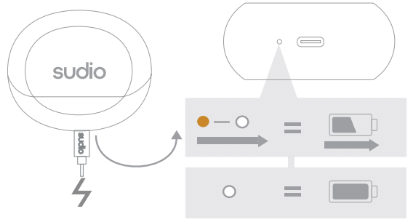
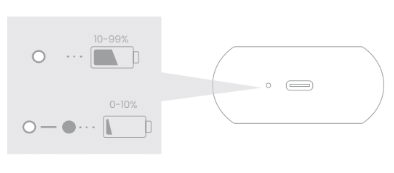
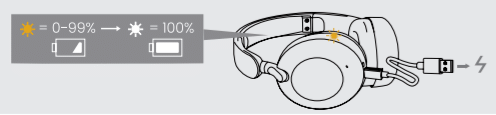
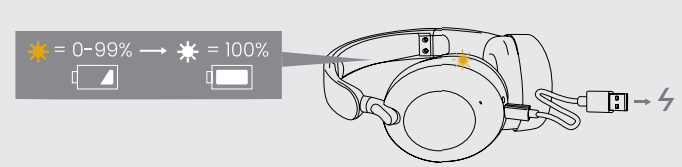
There are four LED-lights that indicate the charging case's remaining level on the front of the case.
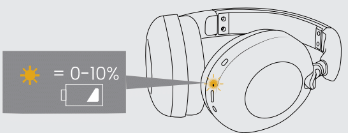
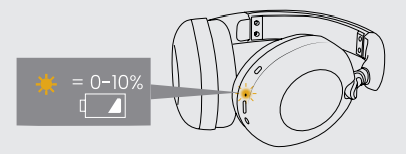
The LED lights up when the earbuds connect and disconnect to the case and when there is less than 25% battery remaining.
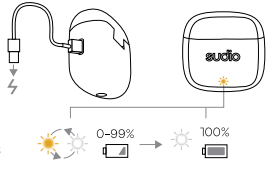
When inserting the charging cable to the case, the current battery level is displayed for 5 seconds followed by a blinking light, indicating that the case is currently charging.
In some cases, you can also read the battery level on your phone, such as iPhone or Android devices. The level shown is that of the N3 Pro earbuds, not the charging case.
Charging case (no cable inserted)
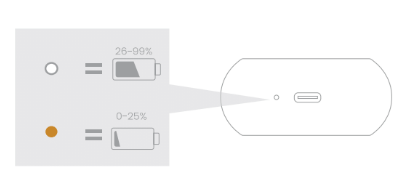
- White: 26-99% battery remaining
- Orange: 0-25% battery remaining
Charging case (with cable inserted and charging)
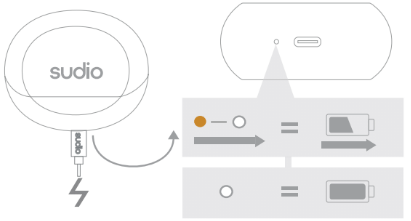
- White (fixed): 100% battery charged
- Orange/White blinking: 0-99% battery charged
N3 Pro - User guide - Download PDF version
N3
N3 - User Guide - First-time setup
Congratulations on receiving your new pair of N3! Use this guide to learn about pairing N3 with your preferred device, charging the batteries, and restoring the earphones to their factory settings.
What's included in the box
- N3 wireless earphones and charging case
- Type-C USB-cable
- Owners manual
- Warnings Manual
Before getting started
⚠️ Sudio N3 is delivered with a protective film covering the charging connectors between the earbuds and charging case. The film needs to be removed in order for the earbuds to charge/turn on.
The earbuds will likely have some existing battery charge, however it is recommended to fully charge N3 before using it for the first time.
Turning N3 on or off
N3 powers up as soon as the earbuds are removed from the charging case, as indicated by the LED lights on the earbuds and the audio feedback 🔈 Power On.
Similarly, N3 is turned off when placing the earbuds back into the case.
You can also use the touch controls to power the earbuds on or off. Do this by holding the touch control for 7 seconds on either earbud.
Pairing with a device
Jump to complete guide
N3 enters pairing mode when the earbuds are removed from the charging case. Open the Bluetooth settings on your device and wait for N3 and the device to locate each other, then select Sudio N3 when it appears in the list. You will hear 🔈 Pairing Successful, confirming that the devices are paired with each other!
Charging the batteries
Jump to complete guide
There are three batteries in total on N3; one in the charging case and one in each earbud.
The N3 earbuds charge their batteries automatically when placed inside the charging case, this is indicated by the LED lights on the earbuds. Make sure to first remove the protective film which is covering the charging connectors.
The N3 case is charged with a Type-C USB-cable. When the case is charging, you will see a light on the front of the charging case. It is recommended to use the Sudio Type-C USB-cable that's included in the package, but the charging case may be compatible with third-party Type-C USB-cables as well.
Restoring N3 to factory settings
Jump to complete guide
If N3 starts behaving unexpectedly, or if you wish to remove the connection between N3 and the connected device, you can perform a factory reset to restore your Sudio N3 to its original settings. This will reset the connection between your paired devices, as well as the connection between the two earbuds.
1. Take the earbuds out of the charging case.
2. Wait until the earbuds have gone through the voice feedback saying: 🔈 Ready to pair, find your Sudio product in the Bluetooth list of your device. Then proceed with pressing and holding both touch points on the earbuds for 6-8 seconds until you hear Power Off.
3. Release the touch button, and once again hold both touch points of the earbuds for 6-8 seconds until you hear 3 clicking sounds.
4. Leave the earbuds out of the case and close to one another for 20 seconds so they can resynchronize.
5. Place the earbuds back in the case and close the lid and allow 1 minute before using the earphones again.
N3 - User guide - Connectivity & Pairing
N3 powers up as soon as the earbuds are removed from the charging case, as indicated by the audio feedback 🔈 Power On. When pairing N3 for the first time, you hear 🔈 On followed by 🔈 Ready to pair, find your Sudio product in the Bluetooth list of your device.
⚠️ Sudio N3 is delivered with a protective film covering the charging connectors between the earbuds and charging case. The film needs to be removed in order for the earbuds to power on.
Pairing N3 with a device
- Remove the N3 earbuds from the charging case and fit them inside your ears.
- Go into the Bluetooth settings on your device. The N3 earbud LED lights are flashing white while scanning for available devices.
- For iOS (iPhone), go to the Settings app and select Bluetooth.
- For Android, go to the Settings app, then select Connections followed by Bluetooth.
- For Windows 10, click on the Start button, select Settings followed by Devices, and then Bluetooth and other devices.
- For macOS, go to the System Preferences app and select Bluetooth.
- Locate and select Sudio N3 in the Bluetooth list on your device.
- When paired you will hear the audio feedback 🔈 Connected.
If N3 has previously been paired with your preferred device, simply remove the earbuds from the charging case and they will automatically connect, so long as Bluetooth is activated on the device and N3 has not been paired with a different device more recently.
Device compatibility
N3 uses Bluetooth version 5.4 which is compatible with a wide range of Bluetooth devices. The paired device does not need to be the same version, but similar versions are more likely to maintain a strong connection.
Signal interference
Some wireless devices may interfere with each others' signals, such as WiFi-routers, smartwatches, other Bluetooth devices, etc. If they operate within the same frequency, you may experience interference such as dropped sound and glitching. The easiest way to locate the cause of interference is by maintaining one connection between devices at the same time or take your N3 and connected device outdoors to see if the interference clears.
N3 can be up to a maximum of 10 meters (32 ft) from the paired device, but the connection may break if they are blocked by walls or similar objects.
Pairing with multiple devices
N3 can remember up to 10 paired devices, which means that you don't have to follow the pairing step every time you switch between devices. When N3 is turned on, it will automatically connect to the device most recently connected.
If you want to reconnect to one of your previously paired devices, please disconnect Sudio N3 first from the device you are currently using, and click "Sudio N3" in the list of the next device you want to connect.
Sudio N3 supports multi-pairing, but you can only play audio from one device at a time. (Multi-point connection is not supported.)
N3 - User guide - Touch controls
N3 has a touch control button on each earbud that allows you to control certain features on your paired device.
Music/video playback
- Touch once on either earbud (left or right) to play or pause
- Touch twice on the left earbud to rewind
- Touch twice on the right earbud to go forward
- Touch three times on the left earbud to decrease volume
- Touch three times on the right earbud to increase volume
Incoming phone calls
- Touch once on either earbud (left or right) to accept a phone call
- Touch (hold) for two seconds on either earbud (left or right) to reject or end a phone call*
- Touch (hold) for two seconds on either earbud to turn the voice assistant On/Off.
Voice assistant only supports IOS systems, for Android systems it is only a partial support
*It's not possible to end a call using the touch controls while using third-party conference software due to different software protocols.
Power
N3 powers on and off automatically when the earbuds are taken out or put back inside the case. However, you can also control this without using the charging case.
- Press (hold) for six seconds on either earbud to power off both earbuds (🔈 Power Off).
- Press (hold) for six seconds on either earbud to power on the single earbud(🔈 Power On).
N3 - User guide - Factory reset
If N3 starts behaving unexpectedly, or if you wish to remove the connection between N3 and the connected device, you can perform a factory reset to restore your Sudio N3 to its original settings. This will reset the connection between your paired devices, as well as the connection between the two earbuds.
1. Take the earbuds out of the charging case.
2. Wait until the earbuds have gone through the voice feedback saying: 🔈 Ready to pair, find your Sudio product in the Bluetooth list of your device. Then proceed with pressing and holding both touch points on the earbuds for 6-8 seconds until you hear Power Off.
3. Release the touch button, and once again hold both touch points of the earbuds for 6-8 seconds until you hear 3 clicking sounds.
4. Leave the earbuds out of the case and close to one another for 20 seconds so they can resynchronize.
5. Place the earbuds back in the case and close the lid and allow 1 minute before using the earphones again.
When you hear 🔈 Ready to pair, find your Sudio product in the Bluetooth list of your device, proceed to pair them with your Bluetooth device.
N3 - User guide - Battery levels and management
N3 has three built-in batteries; one inside the charging case and one in each earbud. The battery inside the case is used to charge the earbuds, while the included Type-C USB-cable is used to charge the case.
Charging and play times
The earbuds can be used for approximately 5.5 hours on one charge, with up to 25 hours in total before the case needs to be recharged.
Each battery takes approximately 90 minutes to fully charge.
Charging methods
The N3 case can be charged with a Type-C USB-cable, wireless charging is not supported. We recommend using the Sudio cable included in the package, however, other third-party Type-C USB-cables may be compatible too.
Battery level indicators
There are four LED-lights that indicate the charging case's remaining level on the front of the case.
The LED lights up when the earbuds connect and disconnect to the case and when there is less than 25% battery remaining.
When inserting the charging cable to the case, the current battery level is displayed for 5 seconds followed by a blinking light, indicating that the case is currently charging.
In some cases, you can also read the battery level on your phone, such as iPhone or Android devices. The level shown is that of the N3 earbuds, not the charging case.
Charging case (no cable inserted)
- White: 10-99% battery remaining
- White Blinking: 0-10% battery remaining
Charging case (with cable inserted and charging)

- Orange (fixed): 100% battery charged
- Orange blinking: 0-99% battery charged
N3 - User guide - Download PDF version
A3 Pro
A3 Pro - User Guide - First-time setup
Congratulations on receiving your new pair of A3 Pro! Use this guide to learn about pairing A3 Pro with your preferred device, charging the batteries, and restoring the earphones to their factory settings.
What's included in the box
- A3 Pro wireless earphones and charging case
- Interchangeable ear tips in five different sizes: XS, S, M, L & XL
- Type-C USB-cable
- Owners manual
- Warnings Manual
Before getting started
⚠️ Sudio A3 Pro is delivered with a protective film covering the charging connectors between the earbuds and charging case. The film needs to be removed in order for the earbuds to charge/turn on.
The earbuds will likely have some existing battery charge, however it is recommended to fully charge A3 Pro before using it for the first time.
Turning A3 Pro on or off
A3 Pro powers up as soon as the earbuds are removed from the charging case, as indicated by the LED lights on the earbuds and the audio feedback 🔈 Power On.
Similarly, A3 Pro is turned off when placing the earbuds back into the case.
You can also use the touch controls to power the earbuds on or off. Do this by holding the touch control for 7 seconds on either earbud.
Pairing with a device
Jump to complete guide

A3 Pro enters pairing mode when the earbuds are removed from the charging case. Open the Bluetooth settings on your device and wait for A3 Pro and the device to locate each other, then select Sudio A3 Pro when it appears in the list. You will hear 🔈 Pairing Successful, confirming that the devices are paired with each other!
Charging the batteries
Jump to complete guide
There are three batteries in total on A3 Pro; one in the charging case and one in each earbud.
The A3 Pro earbuds charge their batteries automatically when placed inside the charging case, this is indicated by the LED lights on the earbuds. Make sure to first remove the protective film which is covering the charging connectors.
The A3 Pro case is charged with a Type-C USB-cable. When the case is charging, you will see a light on the front of the charging case. It is recommended to use the Sudio Type-C USB-cable that's included in the package, but the charging case may be compatible with third-party Type-C USB-cables as well.
Restoring A3 Pro to factory settings
Jump to complete guide
If A3 Pro starts behaving unexpectedly, or if you wish to remove the connection between A3 Pro and the connected device, you can perform a factory reset to restore your Sudio A3 Pro to its original settings. This will reset the connection between your paired devices, as well as the connection between the two earbuds.
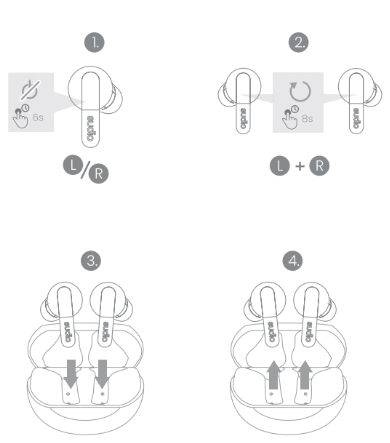
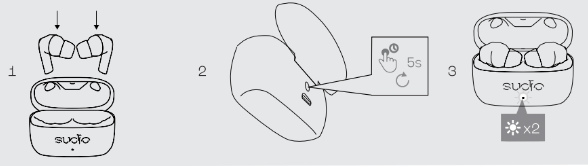
1. Take the earbuds out of the charging case.
2. Wait until the earbuds have gone through the voice feedback saying: 🔈 Ready to pair, find your Sudio product in the Bluetooth list of your device. Then proceed with pressing and holding both touch points on the earbuds for 6-8 seconds until you hear Power Off.
3. Release the touch button, and once again hold both touch points of the earbuds for 6-8 seconds until you hear 3 clicking sounds.
4. Leave the earbuds out of the case and close to one another for 20 seconds so they can resynchronize.
5. Place the earbuds back in the case and close the lid and allow 1 minute before using the earphones again.
A3 Pro - User guide - Connectivity & Pairing
A3 Pro powers up as soon as the earbuds are removed from the charging case, as indicated by the audio feedback 🔈 Power On. When pairing A3 Pro for the first time, you hear 🔈 On followed by 🔈 Ready to pair, find your Sudio product in the Bluetooth list of your device.
⚠️ Sudio A3 Pro is delivered with a protective film covering the charging connectors between the earbuds and charging case. The film needs to be removed in order for the earbuds to power on.
Pairing A3 Pro with a device
- Remove the A3 Pro earbuds from the charging case and fit them inside your ears.
- Go into the Bluetooth settings on your device. The A3 Pro earbud LED lights are flashing white while scanning for available devices.
- For iOS (iPhone), go to the Settings app and select Bluetooth.
- For Android, go to the Settings app, then select Connections followed by Bluetooth.
- For Windows 10, click on the Start button, select Settings followed by Devices, and then Bluetooth and other devices.
- For macOS, go to the System Preferences app and select Bluetooth.
- Locate and select Sudio A3 Pro in the Bluetooth list on your device.
- When paired you will hear the audio feedback 🔈 Connected.
If A3 Pro has previously been paired with your preferred device, simply remove the earbuds from the charging case and they will automatically connect, so long as Bluetooth is activated on the device and A3 Pro has not been paired with a different device more recently.
Device compatibility
A3 Pro uses Bluetooth version 5.4 which is compatible with a wide range of Bluetooth devices. The paired device does not need to be the same version, but similar versions are more likely to maintain a strong connection.
Signal interference
Some wireless devices may interfere with each others' signals, such as WiFi-routers, smartwatches, other Bluetooth devices, etc. If they operate within the same frequency, you may experience interference such as dropped sound and glitching. The easiest way to locate the cause of interference is by maintaining one connection between devices at the same time or take your A3 Pro and connected device outdoors to see if the interference clears.
A3 Pro can be up to a maximum of 10 meters (32 ft) from the paired device, but the connection may break if they are blocked by walls or similar objects.
Pairing with multiple devices
A3 Pro can remember up to 10 devices and will pair automatically with the last used device.
It is possible to keep A3 Pro connected to several devices at the same time, such as a laptop and smartphone simultaneously, A3 Pro supports Multipoint connection.
You can quickly and easily switch between audio sources with your A3 Pro without having to manually disconnect and pair them to one device at a time. Multipoint helps to simplify the process of connecting, disconnecting, and reconnecting your A3 Pro every time you want to use them with a different device.
A3 Pro - User guide - Touch controls
A3 Pro has a touch control button on each earbud that allows you to control certain features on your paired device.
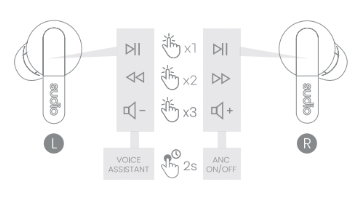
Music/video playback
- Touch once on either earbud (left or right) to play or pause
- Touch twice on the left earbud to rewind
- Touch twice on the right earbud to go forward
- Touch three times on the left earbud to decrease volume
- Touch three times on the right earbud to increase volume
- Touch (hold) for two seconds on the right earbud to turn the ANC On/Off.
- Touch (hold) for two seconds on the left earbud to turn the voice assistant On/Off.
Incoming phone calls
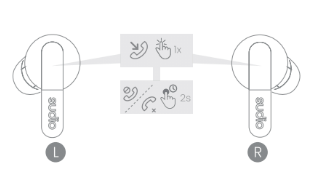
- Touch once on either earbud (left or right) to accept a phone call
- Touch (hold) for two seconds on either earbud (left or right) to reject or end a phone call*
*It's not possible to end a call using the touch controls while using third-party conference software due to different software protocols.
Power
A3 Pro powers on and off automatically when the earbuds are taken out or put back inside the case. However, you can also control this without using the charging case.
- Press (hold) for six seconds on either earbud to power off both earbuds (🔈 Power Off).
- Press (hold) for six seconds on either earbud to power on the single earbud(🔈 Power On).
A3 Pro - User guide - Factory reset
If A3 Pro starts behaving unexpectedly, or if you wish to remove the connection between A3 Pro and the connected device, you can perform a factory reset to restore your Sudio A3 Pro to its original settings. This will reset the connection between your paired devices, as well as the connection between the two earbuds.
1. Take the earbuds out of the charging case.
2. Wait until the earbuds have gone through the voice feedback saying: 🔈 Ready to pair, find your Sudio product in the Bluetooth list of your device. Then proceed with pressing and holding both touch points on the earbuds for 6-8 seconds until you hear Power Off.
3. Release the touch button, and once again hold both touch points of the earbuds for 6-8 seconds until you hear 3 clicking sounds.
4. Leave the earbuds out of the case and close to one another for 20 seconds so they can resynchronize.
5. Place the earbuds back in the case and close the lid and allow 1 minute before using the earphones again.
When you hear 🔈 Ready to pair, find your Sudio product in the Bluetooth list of your device, proceed to pair them with your Bluetooth device.
A3 Pro - User guide - Battery levels and management
A3 Pro has three built-in batteries; one inside the charging case and one in each earbud. The battery inside the case is used to charge the earbuds, while the included Type-C USB-cable is used to charge the case.
Charging and play times
The earbuds can be used for approximately 5 hours on one charge, with up to 25 hours in total before the case needs to be recharged.
Each battery takes approximately 90 minutes to fully charge.
Charging methods
The A3 Pro case can be charged with a Type-C USB-cable, wireless charging is not supported. We recommend using the Sudio cable included in the package, however, other third-party Type-C USB-cables may be compatible too.
Battery level indicators
There are four LED-lights that indicate the charging case's remaining level on the front of the case.
The LED lights up when the earbuds connect and disconnect to the case and when there is less than 25% battery remaining.
When inserting the charging cable to the case, the current battery level is displayed for 5 seconds followed by a blinking light, indicating that the case is currently charging.
In some cases, you can also read the battery level on your phone, such as iPhone or Android devices. The level shown is that of the A3 Pro earbuds, not the charging case.
Charging case (no cable inserted)
- White: 26-99% battery remaining
- Orange: 0-15% battery remaining
Charging case (with cable inserted and charging)
- White (fixed): 100% battery charged
- Orange/White blinking: 0-99% battery charged
A3 Pro - User guide - Download PDF version
A3
A3 - User Guide - First-time setup
Congratulations on receiving your new pair of A3! Use this guide to learn about pairing A3 with your preferred device, charging the batteries, and restoring the earphones to their factory settings.
What's included in the box
- A3 wireless earphones and charging case
- Type-C USB-cable
- Owners manual
- Warnings Manual
Before getting started
⚠️ Sudio A3 is delivered with a protective film covering the charging connectors between the earbuds and charging case. The film needs to be removed in order for the earbuds to charge/turn on.
The earbuds will likely have some existing battery charge, however it is recommended to fully charge A3 before using it for the first time.
Turning A3 on or off
A3 powers up as soon as the earbuds are removed from the charging case, as indicated by the LED lights on the earbuds and the audio feedback 🔈 Power On.
Similarly, A3 is turned off when placing the earbuds back into the case.
You can also use the touch controls to power the earbuds on or off. Do this by holding the touch control for 7 seconds on either earbud.
Pairing with a device
Jump to complete guide
A3 enters pairing mode when the earbuds are removed from the charging case. Open the Bluetooth settings on your device and wait for A3 and the device to locate each other, then select Sudio A3 when it appears in the list. You will hear 🔈 Pairing Successful, confirming that the devices are paired with each other!
Charging the batteries
Jump to complete guide
There are three batteries in total on A3; one in the charging case and one in each earbud.
The A3 earbuds charge their batteries automatically when placed inside the charging case. Make sure to first remove the protective film which is covering the charging connectors.
The A3 case is charged with a Type-C USB-cable. When the case is charging, you will see a light on the front of the charging case. It is recommended to use the Sudio Type-C USB-cable that's included in the package, but the charging case may be compatible with third-party Type-C USB-cables as well.
Restoring A3 to factory settings
Jump to complete guide
If A3 starts behaving unexpectedly, or if you wish to remove the connection between A3 and the connected device, you can perform a factory reset to restore your Sudio A3 to its original settings. This will reset the connection between your paired devices, as well as the connection between the two earbuds.
1. Take the earbuds out of the charging case.
2. Wait until the earbuds have gone through the voice feedback saying: 🔈 Ready to pair, find your Sudio product in the Bluetooth list of your device. Then proceed with pressing and holding both touch points on the earbuds for 6-8 seconds until you hear Power Off.
3. Release the touch button, and once again hold both touch points of the earbuds for 6-8 seconds until you hear 3 clicking sounds.
4. Leave the earbuds out of the case and close to one another for 20 seconds so they can resynchronize.
5. Place the earbuds back in the case and close the lid and allow 1 minute before using the earphones again.
A3 - User guide - Connectivity & Pairing
A3 powers up as soon as the earbuds are removed from the charging case, as indicated by the audio feedback 🔈 Power On. When pairing A3 for the first time, you hear 🔈 On followed by 🔈 Ready to pair, find your Sudio product in the Bluetooth list of your device.
⚠️ Sudio A3 is delivered with a protective film covering the charging connectors between the earbuds and charging case. The film needs to be removed in order for the earbuds to power on.
Pairing A3 with a device
- Remove the A3 earbuds from the charging case and fit them inside your ears.
- Go into the Bluetooth settings on your device. The A3 earbud LED lights are flashing white while scanning for available devices.
- For iOS (iPhone), go to the Settings app and select Bluetooth.
- For Android, go to the Settings app, then select Connections followed by Bluetooth.
- For Windows 10, click on the Start button, select Settings followed by Devices, and then Bluetooth and other devices.
- For macOS, go to the System Preferences app and select Bluetooth.
- Locate and select Sudio A3 in the Bluetooth list on your device.
- When paired you will hear the audio feedback 🔈 Connected.
If A3 has previously been paired with your preferred device, simply remove the earbuds from the charging case and they will automatically connect, so long as Bluetooth is activated on the device and A3 has not been paired with a different device more recently.
Device compatibility
A3 uses Bluetooth version 5.4 which is compatible with a wide range of Bluetooth devices. The paired device does not need to be the same version, but similar versions are more likely to maintain a strong connection.
Signal interference
Some wireless devices may interfere with each others' signals, such as WiFi-routers, smartwatches, other Bluetooth devices, etc. If they operate within the same frequency, you may experience interference such as dropped sound and glitching. The easiest way to locate the cause of interference is by maintaining one connection between devices at the same time or take your A3 and connected device outdoors to see if the interference clears.
A3 can be up to a maximum of 10 meters (32 ft) from the paired device, but the connection may break if they are blocked by walls or similar objects.
Pairing with multiple devices
A3 can remember up to 10 paired devices, which means that you don't have to follow the pairing step every time you switch between devices. When A3 is turned on, it will automatically connect to the device most recently connected.
If you want to reconnect to one of your previously paired devices, please disconnect Sudio A3 first from the device you are currently using, and click "Sudio A3" in the list of the next device you want to connect.
Sudio A3 supports multi-pairing, but you can only play audio from one device at a time. (Multi-point connection is not supported.)
A3 - User guide - Touch controls
A3 has a touch control button on each earbud that allows you to control certain features on your paired device.
Music/video playback
- Touch once on either earbud (left or right) to play or pause
- Touch twice on the left earbud to rewind
- Touch twice on the right earbud to go forward
- Touch three times on the left earbud to decrease volume
- Touch three times on the right earbud to increase volume
Incoming phone calls
- Touch once on either earbud (left or right) to accept a phone call
- Touch (hold) for two seconds on either earbud (left or right) to reject or end a phone call*
- Touch (hold) for two seconds on either earbud to turn the voice assistant On/Off.
Voice assistant only supports IOS systems, for Android systems it is only a partial support
*It's not possible to end a call using the touch controls while using third-party conference software due to different software protocols.
Power
A3 powers on and off automatically when the earbuds are taken out or put back inside the case. However, you can also control this without using the charging case.
- Press (hold) for six seconds on either earbud to power off both earbuds (🔈 Power Off).
- Press (hold) for six seconds on either earbud to power on the single earbud(🔈 Power On).
A3 - User guide - Factory reset
If A3 starts behaving unexpectedly, or if you wish to remove the connection between A3 and the connected device, you can perform a factory reset to restore your Sudio A3 to its original settings. This will reset the connection between your paired devices, as well as the connection between the two earbuds.
1. Take the earbuds out of the charging case.
2. Wait until the earbuds have gone through the voice feedback saying: 🔈 Ready to pair, find your Sudio product in the Bluetooth list of your device. Then proceed with pressing and holding both touch points on the earbuds for 6-8 seconds until you hear Power Off.
3. Release the touch button, and once again hold both touch points of the earbuds for 6-8 seconds until you hear 3 clicking sounds.
4. Leave the earbuds out of the case and close to one another for 20 seconds so they can resynchronize.
5. Place the earbuds back in the case and close the lid and allow 1 minute before using the earphones again.
When you hear 🔈 Ready to pair, find your Sudio product in the Bluetooth list of your device, proceed to pair them with your Bluetooth device.
A3 - User guide - Battery levels and management
A3 has three built-in batteries; one inside the charging case and one in each earbud. The battery inside the case is used to charge the earbuds, while the included Type-C USB-cable is used to charge the case.
Charging and play times
The earbuds can be used for approximately 5.5 hours on one charge, with up to 30 hours in total before the case needs to be recharged.
Each battery takes approximately 90 minutes to fully charge.
Charging methods
The A3 case can be charged with a Type-C USB-cable, wireless charging is not supported. We recommend using the Sudio cable included in the package, however, other third-party Type-C USB-cables may be compatible too.
Battery level indicators
There is one LED-light that indicates the charging case's remaining level on the bottom of the case.
The LED lights up when the earbuds connect and disconnect to the case and when there is less than 10% battery remaining.
In some cases, you can also read the battery level on your phone, such as iPhone or Android devices. The level shown is that of the A3 earbuds, not the charging case.
Charging case (no cable inserted)
- White: 10-99% battery remaining
- White Blinking: 0-10% battery remaining
Laddningsfodral (med kabel insatt och laddar)
- Orange (fixed): 100% battery charged
- Orange blinking: 0-99% battery charged
A3 - User guide - Download PDF version
K2
K2 - User Guide - First-time setup
Congratulations on receiving your new pair of K2! Use this guide to learn about pairing K2 with your preferred device and charging the battery.
What's included in the box
- K2 headphones
- USB-C cable
- Owners manual
- Warnings Folder
Before getting started
The headphones will likely have some existing battery charge, however it is recommended to fully charge K2 before using it for the first time.
Turning K2 on or off
Press (hold) the button for 2 seconds until the white light is blinking and you hear "On".
If you want to turn off your K2 then press (hold) the button for five seconds until the white light turns off and you hear "Off".
Pairing with a device
Jump to complete guide
Hold the button on your K2 for 2 seconds to turn it on. The white flash means that your headphones are now turned on and ready to pair.
Open the Bluetooth settings on your device and wait for K2 and the device to locate each other, then select Sudio K2 when it appears in the list. Once connected, you will hear "Connected".
Charging the battery
Jump to complete guide
K2 has one built-in battery in the headphones.
K2 is charged with a USB-C cable. It is recommended to use the USB-C cable that's included in the package, but the headphones may be compatible with third-party USB-C cables as well.
K2 - User guide - Connectivity & Pairing
Pairing K2 with a device
- Hold the button on your K2 for 2 seconds. The white flash means that your headphones are now turned on and ready to pair.
- Go into the Bluetooth settings on your device.
- For iOS (iPhone), go to the Settings app and select Bluetooth.
- For Android, go to the Settings app, then select Connections followed by Bluetooth.
- For Windows 10, click on the Start button, select Settings followed by Devices, and then Bluetooth and other devices.
- For macOS, go to the System Preferences app and select Bluetooth.
- Locate and select Sudio K2 in the Bluetooth list on your device.
- Your Sudio K2 is now paired with your device.
- To turn off your headphones, hold the middle button for 5 seconds. The white light will turn off, this means the earphones are now turned off.
Device compatibility
K2 uses Bluetooth version 5.3 which is compatible with a wide range of Bluetooth devices. The paired device does not need to be the same version, but similar versions are more likely to maintain a strong connection.
Signal interference
Some wireless devices may interfere with each others' signals, such as WiFi-routers, smartwatches, other Bluetooth devices, etc. If they operate within the same frequency, you may experience interference such as dropped sound and glitching. The easiest way to locate the cause of interference is by maintaining one connection between devices at the same time or taking your K2 and connected device outdoors to see if the interference clears.
K2 can be up to a maximum of 10 meters (49 ft) from the paired device, but the connection may break if they are blocked by walls or similar objects.
K2 - User guide - Touch controls
K2 has a touch panel that allow you to control certain features on your paired device.
Music/video playback
- Tap once on the touch panel to pause/play music.
- Tap twice on the touch panel to go to the next song.
- Tap three times on the touch panel to go back to the previous song.
Volume
- Hold your finger for 2 seconds on the touch panel to turn up the volume.
- Hold your finger for 3 seconds on the touch panel to turn down the volume.
Incoming phone calls
- Tap once on the touch panel to accept a phone call
- Tap twice on the touch panel to hang up or to reject an incoming phone call
Power
- Press (hold) the button for 2 seconds until the white light is blinking to power on your K2.
- Press (hold) the button for 5 seconds until the light turns off to power off your K2.
Active Noise Cancellation (ANC)
- Press (hold) the button for 2 seconds after the headphone have turned on to turn on the ANC.
- Press (hold) the button for 2 seconds to turn off the ANC.
K2 - User guide - Factory reset
If K2 starts behaving unexpectedly, or if you wish to remove the connection between K2 and the connected device, you can perform a factory reset to restore your Sudio K2 to its original settings. This will reset the connection between your paired devices.
- Turn off the K2 by pressing (holding) the button for 4 seconds until you hear "Off".
- Press (hold) on the button again for 10 seconds until the light blinks white twice and you hear 2 clicks.
- The reset is now complete.
When you hear 🔈 Ready to pair, proceed to pair K2 with your Bluetooth device.
K2 - User guide - Battery levels and management
K2 has one built-in battery in the headphones.
Charging and play times
The headphones can be used for approximately 60 hours on one charge (27 hours with the ANC on).
The battery takes approximately 90 minutes to fully charge. K2 does not support quick charge.
Charging methods
K2 can be charged with a USB-C cable included in the packaging.
We recommend using the Sudio cable included in the package, however, other third-party USB-C cables may be compatible too.
Battery level indicators
Headphones (no cable inserted)
When the battery level is extremely low (0-10%), the LED light indicator on the headphones will start flashing orange.
Battery life status will be indicated on your smartphone for iOS and most Android devices. Since phone manufacturers have various Android devices that work differently, you can also download various battery apps on the Google Play Store.
Headphones (with cable inserted and charging)
- Amber light - 0-99% battery charged
- White fixed light - 100% battery charged
K2 - Features - Active Noise Cancellation (ANC)
K2 features two audio modes that let you decide what you want to hear - and what you don't want to hear. These two modes are called Active Noise Cancellation (ANC), and Normal (Off) mode.
The Active Noise Cancellation (ANC) mode in K2 reduces outside noise which allows you to fully immerse yourself in your own world.
How to switch between the modes
The headphones are in Normal (Off) mode by default, where background noise is neither reduced nor amplified. By pressing the button on the K2 for 2 seconds when they are turned on, you can turn on the ANC. Press on the button again for 2 seconds to turn ANC off.
How does Active Noise Cancellation (ANC) work?
The mechanics behind Active Noise Cancellation is in its name. The built-in microphones on K2 listen to the noise outside and inside the headphones while using the speaker to emit the same noise - but inverted - which reduces the outside noise nearly entirely. K2 uses Hybrid ANC technology, which is a combination of Feed Forward and Feedback ANC technology.
K2 Pro
K2 Pro - User Guide - First-time setup
Congratulations on receiving your new pair of K2 Pro! Use this guide to learn about pairing K2 Pro with your preferred device and charging the battery.
What's included in the box
- K2 Pro headphones
- USB-C cable
- Owners manual
- Warnings Folder
Before getting started
The headphones will likely have some existing battery charge, however it is recommended to fully charge K2 Pro before using it for the first time.
Turning K2 Pro on or off
Press (hold) the button for 3 seconds until the white light is blinking and you hear "On".
If you want to turn off your K2 Pro then press (hold) the button for five seconds until the white light turns off and you hear "Off".
Pairing with a device
Jump to complete guide
Hold the button on your K2 Pro for 3 seconds to turn it on. The white flash means that your headphones are now turned on and ready to pair.
Open the Bluetooth settings on your device and wait for K2 Pro and the device to locate each other, then select Sudio K2 Pro when it appears in the list. Once connected, you will hear "Connected".
Charging the battery
Jump to complete guide
K2 Pro has one built-in battery in the headphones.
K2 Pro is charged with a USB-C cable. It is recommended to use the USB-C cable that's included in the package, but the headphones may be compatible with third-party USB-C cables as well.
K2 Pro - User guide - Connectivity & Pairing
Pairing K2 Pro with a device

- Hold the button on your K2 Pro for 3 seconds. The white flash means that your headphones are now turned on and ready to pair.
- Go into the Bluetooth settings on your device.
- For iOS (iPhone), go to the Settings app and select Bluetooth.
- For Android, go to the Settings app, then select Connections followed by Bluetooth.
- For Windows 10, click on the Start button, select Settings followed by Devices, and then Bluetooth and other devices.
- For macOS, go to the System Preferences app and select Bluetooth.
- Locate and select Sudio K2 Pro in the Bluetooth list on your device.
- Your Sudio K2 Pro is now paired with your device.
- To turn off your headphones, hold the middle button for 5 seconds. The white light will turn off, this means the earphones are now turned off.
Device compatibility
K2 Pro uses Bluetooth version 5.4 which is compatible with a wide range of Bluetooth devices. The paired device does not need to be the same version, but similar versions are more likely to maintain a strong connection.
Signal interference
Some wireless devices may interfere with each others' signals, such as WiFi-routers, smartwatches, other Bluetooth devices, etc. If they operate within the same frequency, you may experience interference such as dropped sound and glitching. The easiest way to locate the cause of interference is by maintaining one connection between devices at the same time or taking your K2 Pro and connected device outdoors to see if the interference clears.
K2 Pro can be up to a maximum of 10 meters (49 ft) from the paired device, but the connection may break if they are blocked by walls or similar objects.
K2 Pro - User guide - Touch controls
K2 Pro has a touch panel that allow you to control certain features on your paired device.
Music/video playback
- Tap once on the touch panel to pause/play music.
- Tap twice on the touch panel to go to the next song.
- Tap three times on the touch panel to go back to the previous song.
- Hold your finger for 2 seconds on the touch panel to turn up the volume.
- Hold your finger for 3 seconds on the touch panel to turn down the volume.
Incoming phone calls
- Tap once on the touch panel to accept a phone call
- Hold on the ride side of the touch panel for 2 seconds to hang up or to reject an incoming phone call
Power

- Press (hold) the button for 3 seconds until the white light is blinking to power on your K2 Pro.
- Press (hold) the button for 5 seconds until the light turns off to power off your K2 Pro.
Active Noise Cancellation (ANC)
- Press (hold) the button for 2 seconds after the headphone have turned on to turn on the ANC.
- Press (hold) the button for 2 seconds to turn off the ANC.
K2 Pro - User guide - Factory reset
If K2 Pro starts behaving unexpectedly, or if you wish to remove the connection between K2 and the connected device, you can perform a factory reset to restore your Sudio K2 Pro to its original settings. This will reset the connection between your paired devices.
- Turn off the K2 Pro by pressing (holding) the button for 4 seconds until you hear "Off".
- Press (hold) on the button again for 10 seconds until the light blinks white twice.
- The reset is now complete.
When you hear 🔈 Ready to pair, proceed to pair K2 Pro with your Bluetooth device.
K2 Pro - User guide - Battery levels and management
K2 Pro has one built-in battery in the headphones.
Charging and play times
The headphones can be used for approximately 65 hours on one charge (30 hours with the ANC on).
The battery takes approximately 150 minutes to fully charge. K2 Pro does not support quick charge.
Charging methods
K2 Pro can be charged with a USB-C cable included in the packaging.
We recommend using the Sudio cable included in the package, however, other third-party USB-C cables may be compatible too.
Battery level indicators
Headphones (no cable inserted)
When the battery level is extremely low (0-10%), the LED light indicator on the headphones will start flashing orange.
Battery life status will be indicated on your smartphone for iOS and most Android devices. Since phone manufacturers have various Android devices that work differently, you can also download various battery apps on the Google Play Store.
Headphones (with cable inserted and charging)
- Amber light - 0-99% battery charged
- White fixed light - 100% battery charged
K2 Pro - User guide - Download PDF version
N2
N2 - User Guide - First-time setup
Congratulations on receiving your new pair of N2! Use this guide to learn about pairing N2 with your preferred device, charging the batteries, and restoring the earphones to their factory settings.
What's included in the box
- N2 wireless earphones and charging case
- Type-C USB-cable
- Owners manual
- Warnings Manual
Before getting started
The earbuds will likely have some existing battery charge, however it is recommended to fully charge N2 before using it for the first time.
Turning N2 on or off
N2 powers up as soon as the lid on the charging case is opened, as indicated by the LED lights on the earbuds and the audio feedback 🔈 On.
Similarly, N2 is turned off when placing the earbuds back into the case.
You can also use the touch controls to power the earbuds on or off. Do this by holding the touch control for 5 seconds on either earbud until you hear the audio feedback 🔈 On or 🔈 Off.
Pairing with a device
Jump to complete guide
N2 enters pairing mode when opening the lid on the charging case. Open the Bluetooth settings on your device and wait for N2 and the device to locate each other, then select Sudio N2 when it appears in the list. You will hear 🔈 Connected, confirming that the devices are paired with each other!
Charging the batteries
Jump to complete guide
There are three batteries in total on N2; one in the charging case and one in each earbud.
The N2 earbuds charge their batteries automatically when placed inside the charging case, this is indicated by the LED lights on the earbuds. Make sure to first remove the protective film which is covering the charging connectors.
The N2 case is charged with a Type-C USB-cable and can also be charged wirelessly. When the case is charging, you will see a light on the front o the charging case. It is recommended to use the Sudio Type-C USB-cable that's included in the package, but the charging case may be compatible with third-party Type-C USB-cables as well.
Restoring N2 to factory settings
Jump to complete guide
If N2 is behaving unexpectedly or you simply wish to restore it to its original settings, reset it by placing the earbuds inside the case and press the button on the bottom of the case for 5 seconds. The reset is complete when the LED light on the front of the case flashes white twice.
You may then proceed with pairing N2 again.
N2 - User guide - Connectivity & Pairing
Sudio N2 enters pairing mode immediately when opening the lid on the charging case. When pairing N2 for the first time, you hear 🔈 On followed by 🔈 Ready to pair, find your Sudio product in the Bluetooth list of your device.
Pairing N2 with a device
- Remove the N2 earbuds from the charging case and fit them inside your ears.
- Go into the Bluetooth settings on your device. The N2 earbud LED lights are flashing white and orange while scanning for available devices.
- For iOS (iPhone), go to the Settings app and select Bluetooth.
- For Android, go to the Settings app, then select Connections followed by Bluetooth.
- For Windows 10, click on the Start button, select Settings followed by Devices, and then Bluetooth and other devices.
- For macOS, go to the System Preferences app and select Bluetooth.
- Locate and select Sudio N2 in the Bluetooth list on your device.
- When paired you will hear the audio feedback 🔈 Connected.
If N2 has previously been paired with your preferred device, simply remove the earbuds from the charging case and they will automatically connect, so long as Bluetooth is activated on the device and N2 has not been paired with a different device more recently.
Device compatibility
N2 uses Bluetooth version 5.3 which is compatible with a wide range of Bluetooth devices. The paired device does not need to be the same version, but similar versions are more likely to maintain a strong connection.
Signal interference
Some wireless devices may interfere with each others' signals, such as WiFi-routers, smartwatches, other Bluetooth devices, etc. If they operate within the same frequency, you may experience interference such as dropped sound and glitching. The easiest way to locate the cause of interference is by maintaining one connection between devices at the same time or take your N2 and connected device outdoors to see if the interference clears.
N2 can be up to a maximum of 10 meters (32 ft) from the paired device, but the connection may break if they are blocked by walls or similar objects.
Pairing with multiple devices
N2 can remember up to 10 devices and will pair automatically with the last used device.
It is possible to keep N2 connected to several devices at the same time, such as a laptop and smartphone simultaneously, N2 supports Multipoint connection.
You can quickly and easily switch between audio sources with your N2 without having to manually disconnect and pair them to one device at a time. Multipoint helps to simplify the process of connecting, disconnecting, and reconnecting your N2 every time you want to use them with a different device.
N2 - User guide - Touch controls
N2 has a touch control button on each earbud that allows you to control certain features on your paired device.
Music/video playback

- Touch once on either earbud (left or right) to play or pause
- Touch twice on the left earbud to rewind
- Touch twice on the right earbud to go forward
- Touch three times on the left earbud to decrease volume
- Touch three times on the right earbud to increase volume
- Touch (hold) for two seconds on either earbud (left or right) to talk to the voice assistant.
- Touch (hold) for two seconds on either earbud (left or right) to exit the voice assistant.
Incoming phone calls
- Touch once on either earbud (left or right) to accept a phone call
- Touch (hold) for two seconds on either earbud (left or right) to reject or end a phone call*
*It's not possible to end a call using the touch controls while using third-party conference software due to different software protocols.
Power
N2 powers on and off automatically when the earbuds are taken out or put back inside the case. However, you can also control this without using the charging case.
- Touch (hold) for five seconds on either earbud (left or right) to power on (single earbud).
- Touch (hold) for five seconds on either earbud to power off (both earbuds). After 5 seconds the listening mode will change, followed by 🔈 Off.
N2 - User guide - Factory reset
If N2 starts behaving unexpectedly, or if you wish to remove the connection between N2 and the connected device, you can perform a factory reset to restore your Sudio N2 to its original settings. This will reset the connection between your paired devices, as well as the connection between the two earbuds.
- Place the earbuds back into the charging case, keep the lid of the case open.
- Press and hold the reset button on the bottom of the case for 5-7 seconds.
- The factory reset is complete when the LED light on the front of the case starts flashing white slowly.
- Close the lid and allow 3 minutes before using the earphones again.
When you hear 🔈 Ready to pair, find your Sudio product in the Bluetooth list of your device, proceed to pair them with your Bluetooth device.
N2 - User guide - Battery levels and management
N2 has three built-in batteries; one inside the charging case and one in each earbud. The battery inside the case is used to charge the earbuds, while the included Type-C USB-cable is used to charge the case.
Charging and play times
The earbuds can be used for approximately 6 hours on one charge, with up to 30 hours in total before the case needs to be recharged.
Each battery takes approximately 120 minutes to fully charge.
Charging methods
The N2 case can be charged with a Type-C USB-cable, wireless charging is not supported. We recommend using the Sudio cable included in the package, however, other third-party Type-C USB-cables may be compatible too.
Battery level indicators
There is one LED-light that indicates the charging case's remaining level on the front of the case.
The LED lights up when the earbuds connect and disconnect to the case and when there is less than 25% battery remaining.
When inserting the charging cable to the case, the current battery level is displayed for 5 seconds followed by a blinking light, indicating that the case is currently charging.
In some cases, you can also read the battery level on your phone, such as iPhone or Android devices. The level shown is that of the N2 earbuds, not the charging case.
Charging case (no cable inserted)
- White: 26-100% battery remaining
- Orange: 0-25% battery remaining
Charging case (with cable inserted and charging)
- White (fixed): 100% battery charged
- Orange/White blinking: 0-99% battery charged
N2 - User guide - Download PDF version
E3
E3 - User Guide - First-time setup
Congratulations on receiving your new pair of E3! Use this guide to learn about pairing E3 with your preferred device, charging the batteries, and restoring the earphones to their factory settings.
What's included in the box
- E3 wireless earphones and charging case
- Interchangeable ear tips in five different sizes: XS, S, M & L &
- Type-C USB-cable
- Microfiber cloth
- Owners manual
Before getting started
⚠️ Sudio E3 is delivered with a red protective film covering the charging connectors between the earbuds and charging case. The film needs to be removed in order for the earbuds to power on.
The earbuds will likely have some existing battery charge, however it is recommended to fully charge E3 before using it for the first time.
Turning E3 on or off
E3 powers up as soon as the lid on the charging case is opened, as indicated by the LED lights on the earbuds and the audio feedback 🔈 On.
Similarly, E3 is turned off when placing the earbuds back into the case.
You can also use the touch controls to power the earbuds on or off. Do this by holding the touch control for 5 seconds on either earbud.
Pairing with a device
Jump to complete guide
E3 enters pairing mode when opening the lid on the charging case. Open the Bluetooth settings on your device and wait for E3 and the device to locate each other, then select Sudio E3 when it appears in the list. You will hear 🔈 Connected, confirming that the devices are paired with each other!
Charging the batteries
Jump to complete guide
There are three batteries in total on E3; one in the charging case and one in each earbud.
The E3 earbuds charge their batteries automatically when placed inside the charging case. Make sure to first remove the protective film which is covering the charging connectors.
The E3 case is charged with a Type-C USB-cable and can also be charged wirelessly. When the case is charging, you will see a light on the front o the charging case. It is recommended to use the Sudio Type-C USB-cable that's included in the package, but the charging case may be compatible with third-party Type-C USB-cables as well.
Restoring E3 to factory settings
Jump to complete guide
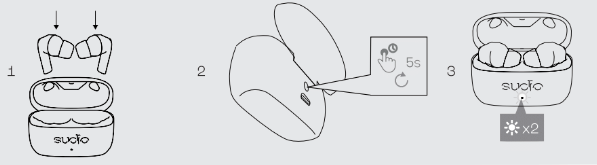
If E3 is behaving unexpectedly or you simply wish to restore it to its original settings, reset it by placing the earbuds inside the case and, with the lid open, press the button on the back of the case for 5 seconds. The reset is complete when the LED light on the front of the case flashes white twice.
You may then proceed with pairing E3 again.
E3 - User guide - Connectivity & Pairing
Sudio E3 enters pairing mode immediately when opening the lid on the charging case. When pairing E3 for the first time, you hear 🔈 On followed by 🔈 Ready to pair, find your Sudio product in the Bluetooth list of your device.
⚠️ Sudio E3 is delivered with a red protective film covering the charging connectors between the earbuds and charging case. The film needs to be removed in order for the earbuds to power on.
Pairing E3 with a device
- Remove the E3 earbuds from the charging case and fit them inside your ears.
- Go into the Bluetooth settings on your device. The E3 earbud LED lights are flashing white while scanning for available devices.
- For iOS (iPhone), go to the Settings app and select Bluetooth.
- For Android, go to the Settings app, then select Connections followed by Bluetooth.
- For Windows 10, click on the Start button, select Settings followed by Devices, and then Bluetooth and other devices.
- For macOS, go to the System Preferences app and select Bluetooth.
- Locate and select Sudio E3 in the Bluetooth list on your device.
- When paired you will hear the audio feedback 🔈 Connected.
If E3 has previously been paired with your preferred device, simply remove the earbuds from the charging case and they will automatically connect, so long as Bluetooth is activated on the device and E3 has not been paired with a different device more recently.
Device compatibility
E3 uses Bluetooth version 5.2 which is compatible with a wide range of Bluetooth devices. The paired device does not need to be the same version, but similar versions are more likely to maintain a strong connection.
Signal interference
Some wireless devices may interfere with each others' signals, such as WiFi-routers, smartwatches, other Bluetooth devices, etc. If they operate within the same frequency, you may experience interference such as dropped sound and glitching. The easiest way to locate the cause of interference is by maintaining one connection between devices at the same time or take your E3 and connected device outdoors to see if the interference clears.
E3 can be up to a maximum of 10 meters (32 ft) from the paired device, but the connection may break if they are blocked by walls or similar objects.
Pairing with multiple devices
E3 can remember up to 10 devices and will pair automatically with the last used device.
It is possible to keep E3 connected to several devices at the same time, such as a laptop and smartphone simultaneously, E3 supports Multipoint connection.
You can quickly and easily switch between audio sources with your E3 without having to manually disconnect and pair them to one device at a time. Multipoint helps to simplify the process of connecting, disconnecting, and reconnecting your E3 every time you want to use them with a different device.
E3 - User guide - Touch controls
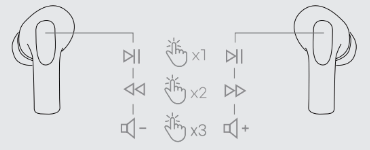
E3 has a touch control button on each earbud that allows you to control certain features on your paired device.
Music/video playback
-
Touch once on either earbud (left or right) to play or pause
-
Touch twice on the left earbud to rewind
-
Touch twice on the right earbud to go forward
-
Touch three times on the left earbud to decrease volume
-
Touch three times on the right earbud to increase volume
Incoming phone calls
-
Touch once on either earbud (left or right) to accept a phone call
-
Touch (hold) for two seconds on either earbud (left or right) to reject or end a phone call*
*It's not possible to end a call using the touch controls while using third-party conference software due to different software protocols.
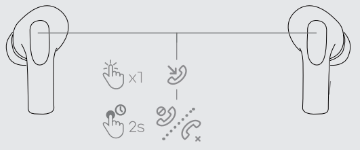
Active Noise Cancellation and Voice Assistant
-
Touch (hold) for two seconds on the right earbud to cycle between Normal mode and Active Noise Cancellation mode
-
Touch (hold) for two seconds on the left earbud to turn the Voice Assistant on/off
Power
E3 powers on and off automatically when the earbuds are taken out or put back inside the case. However, you can also control this without using the charging case.
-
Touch (hold) for five seconds on either earbud (left or right) to power on (single earbud).
-
Touch (hold) for five seconds on either earbud to power off (both earbuds). After 2 seconds the listening mode will change, followed by 🔈 Off.
E3 - User guide - Factory reset
If E3 starts behaving unexpectedly, or if you wish to remove the connection between E3 and the connected device, you can perform a factory reset to restore your Sudio E3 to its original settings. This will reset the connection between your paired devices, as well as the connection between the two earbuds.
- Place the earbuds back into the charging case and keep the lid open.
- Press and hold the reset button on the back of the case for 5 seconds.
- The factory reset is complete when the LED light on the front of the case flashes white twice.
- Close the lid and allow 1-2 minutes before using the earphones again.
When you hear 🔈 Ready to pair, find your Sudio product in the Bluetooth list of your device, proceed to pair them with your Bluetooth device.
E3 - User guide - Battery levels and management
E3 has three built-in batteries; one inside the charging case and one in each earbud. The battery inside the case is used to charge the earbuds, while the included Type-C USB-cable is used to charge the case.
Before using your E3 for the first time
⚠️ Sudio E3 is delivered with a protective film covering the charging connectors between the earbuds and charging case. The film needs to be removed in order for the earbuds to power on.
Charging and play times
The earbuds can be used for approximately 6 hours on one charge (4.5 hours while using ANC), with up to 30 hours in total before the case needs to be recharged.
Each battery takes approximately 90 minutes to fully charge.
Charging methods
The E3 case can be charged with a Type-C USB-cable, wireless charging is also supported. We recommend using the Sudio cable included in the package, however, other third-party Type-C USB-cables may be compatible too.
Battery level indicators
The charging case’s indicating light is on the front of the case. The earbuds do not have an indicating light.
The LED on the case lights up when the earbuds connect and disconnect to the case and when there is less than 25% battery remaining.
When inserting the charging cable to the case, the current battery level is displayed for 5 seconds followed by a blinking light, indicating that the case is currently charging.
In some cases, you can also read the battery level on your phone, such as iPhone or Android devices. The level shown is that of the E3 earbuds, not the charging case.
Charging case (no cable inserted)

- White: 26-100% battery remaining
- Orange: 0-25% battery remaining
Charging case (with cable inserted and charging)
- White (fixed): 100% battery charged
- Orange/White blinking: 0-99% battery charged
E3 - User guide - Getting the perfect fit
Sudio E3 has gone through extensive research and testing to result in an ergonomic design that provides all-day comfort and is ideal for long listening sessions.
To fit the earbud inside your ear, place it with the touch button facing outwards and slightly twist it in place.
E3 is delivered with four interchangeable silicone ear tips in sizes XS, S, M and L. The size M ear tips come pre-fitted on the earbuds. If needed, change these to find the size that best fits your ears without compromising comfort.
T2
T2 - Руководство пользователя - Первичная настройка

Поздравляем с Sudio T2! Используйте это руководство, чтобы узнать о сопряжении T2 с устройствами, зарядке аккумуляторов и восстановлении заводских настроек наушников.
Что входит в комплект
- Беспроводные наушники Sudio T2 футляр для зарядки
- Interchangeable ear tips in four different sizes: XS, S, M & L
- USB-кабель Type-C
- Салфетка из микроволокна
- Руководство пользователя
Перед тем, как начать
⚠️ Sudio T2 поставляется с защитной пленкой, закрывающей зарядные разъемы между наушниками и зарядным чехлом. Снимите пленку, чтобы включить наушники.
Скорее всего, у наушников будет некоторый заряд батареи, однако рекомендуется зарядить T2 до 100% перед первым использованием.
Включение или выключение T2
T2 включаются, как только открывается крышка зарядного футляра, на что указывают светодиоды на наушниках и звуковой сигнал 🔈On
T2 отключаются, когда наушники кладутся обратно в футляр.
Сенсорное управление так же позволяет включать и выключать наушники. Отключите наушники путём удерживания сенсорной кнопки в течение 5 секунд на любом наушнике.
Сопряжение с устройством
Перейти к полному руководству
T2 переходят в режим сопряжения при открытии крышки зарядного футляра. Откройте настройки Bluetooth на устройстве и подождите, пока T2 и устройство определят друг друга, затем выберите Sudio T2 из списка. Вы услышите 🔈 Connected, подтверждающий, что устройства сопряжены друг с другом.
Зарядка аккумуляторов
Перейти к полному руководству
В Sudio Т2 три батареи; одна в зарядном футляре и по одной в каждом наушнике.
Наушники T2 автоматически заряжаются, когда помещаются в зарядный футляр, на что указывают светодиоды на наушниках. Обязательно удалите защитную пленку, закрывающую зарядные разъемы.
Футляр T2 заряжается с помощью USB-кабеля Type-C. Когда футляр заряжается, вы увидите индикатор под зарядным портом (куда вставлен кабель). Рекомендуется использовать USB-кабель Sudio Type-C, входящий в комплект, но зарядный чехол может быть совместим и с USB-кабелями Type-C других производителей.
Восстановление Т2 до заводских настроек
Перейти к полному руководству

Если T2 ведут себя некорректно или вы хотите восстановить их исходные настройки, сбросьте из, поместив наушники внутрь футляра и при открытой крышке нажмите кнопку на нижней стороне футляра и удерживайте ее в течение 5 секунд. Сброс завершен, когда светодиод на корпусе дважды мигнет белым.
Затем можно снова продолжить сопряжение T2.
T2 - Руководство пользователя - Подключение и сопряжение
Sudio T2 сразу переходит в режим сопряжения при открытии крышки зарядного футляра. При первом сопряжении T2 вы услышите 🔈On с последующим 🔈 Ready to pair, find your Sudio product in the Bluetooth list of your device. (Наушники готовы к сопряжению, выберите Sudio продукт из списка на вашем девайсе)
⚠️ Sudio T2 поставляются с защитной пленкой, закрывающей зарядные разъемы между наушниками и зарядным чехлом. Удалите пленку, чтобы включить наушники.
Сопряжение Т2 с устройством.
- Извлеките наушники T2 из зарядного футляра и наденьте их.
- Зайдите в настройки Bluetooth на устройстве. Светодиодные индикаторы наушников T2 мигают белым и оранжевым светом во время поиска доступных устройств.
- Для iOS (iPhone) перейдите в приложение «Настройки» и выберите Bluetooth.
- Для Android перейдите в приложение «Настройки», затем выберите «Подключения», а затем «Bluetooth».
- В Windows 10 нажмите кнопку «Пуск», выберите «Настройки», затем «Устройства», а затем «Bluetooth» и другие устройства.
- Для macOS перейдите в приложение «Системные настройки» и выберите Bluetooth.
- Найдите и выберите Sudio T2 в списке Bluetooth на вашем устройстве.
- При сопряжении вы услышите звуковой сигнал 🔈 Connected.
Если T2 уже сопряжен с устройством, извлеките наушники из зарядного футляра и они подключатся автоматически, при условии, что на устройстве активирован Bluetooth, а T2 не были сопряжены с другим устройством ранее.
Совместимость устройства
T2 использует Bluetooth версии 5.2, которая совместима с широким спектром устройств Bluetooth. Сопряженное устройство необязательно должно быть одной и той же версии, но похожие версии с большей вероятностью будут поддерживать надежное соединение.
Помехи сигнала
Некоторые беспроводные устройства могут создавать помехи для сигналов, например, Wi-Fi роутер, умные часы, другие устройства с Bluetooth и т.д. Если они работают на одной и той же частоте, вы можете столкнуться с помехами, такими как пропадание звука и сбои. Чтобы определить причину помех, поддерживайте соединение между устройствами одновременно, либо же вынесите T2 и подключенное устройство на улицу, чтобы проверить, исчезнут ли помехи.
T2 может находиться на расстоянии не более 10 метров от сопряженного устройства, но соединение может прерваться, если они заблокированы стенами или габаритными предметами.
Сопряжение с несколькими устройствами
T2 запоминают до 10 устройств и автоматически подключаются к последнему используемому устройству. Чаще всего можно переключаться между устройствами, выбирая Sudio T2 в списке Bluetooth. Однако некоторые устройства требуют, чтобы T2 были полностью отключены от предыдущего устройства, прежде чем их можно будет подключить. Невозможно подключить T2 к нескольким устройствам одновременно, как пример одновременное подключение к ноутбуку и смартфону невозможно.
T2 - Руководство пользователя - Сенсорное управление
На каждом наушнике Sudio T2 расположена сенсорная кнопка управления, с помощью которой управляются функции на подключённом устройстве.
Воспроизведение музыки или видео
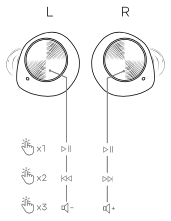
- Нажмите один раз на наушник (левый или правый), чтобы воспроизвести или становить воспроизведение.
- Коснитесь дваждылевого наушника для перемотки назад
- Коснитесь дваждыправого наушника для перемотки вперёд
- Коснитесь триждылевого наушника чтобы уменьшить громкость
- Коснитесь триждыправого наушника чтобы увеличить громкость
Входящие звонки
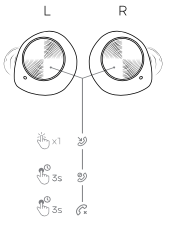
- Нажмите один раз на наушник (левый или правый) чтобы принять звонок
- Нажмите (и держите) 3 секунды на наушник (левый или правый) чтобы сбросить звонок*
*Невозможно завершить вызов с помощью сенсорного управления при использовании стороннего программного обеспечения для конференций из-за разных программных протоколов*
Активное Шумоподавление и Режим Прозрачности
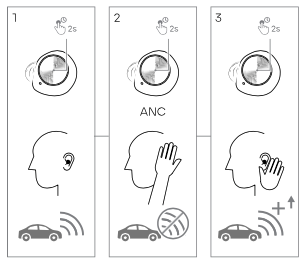
- Нажмите (и держите) 2 секунды на наушнике (левом или правом) для переключения из обычного режима в режим активного шумоподавления или режим прозрачности.
T2 включаются и выключаются автоматически, когда наушники вынимаются или кладутся обратно в зарядный футляр. Эта функция контролируется и на самих наушниках.
- Нажмите (и держите) 5 секунд на наушнике (левом или правом) для включения (одного наушника).
- Нажмите (и держите) 5 секунд на любом наушнике для выключения (двух наушников).
Через 2 секунды режим прослушивания изменится, а затем появится 🔈 Off.
T2 - Руководство пользователя - Восстановление заводских настроек
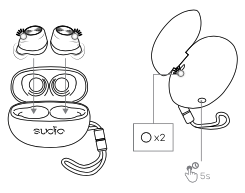
Если T2 начинают вести себя некорректно или же необходимо удалить соединение между T2 и подключенным устройством, выполните сброс настроек до заводских, чтобы восстановить исходные настройки Sudio T2. Это сбросит соединение между сопряженными устройствами, а также соединение между двумя наушниками.
- Поместите наушники в зарядный футляр и держите крышку открытой.
- Нажмите и удерживайте кнопку сброса внизу корпуса в течение 5 секунд.
- Восстановление заводских настроек завершено, когда светодиодный индикатор на задней панели корпуса дважды мигнет белым.
- Закройте крышку и подождите 1-2 минуты, прежде чем снова использовать наушники.
Когда вы услышите 🔈 Ready to pair, найдите продукт Sudio в списке Bluetooth на вашем устройстве, приступайте к сопряжению с устройством Bluetooth.
T2 - Руководство пользователя - Уровни заряда батареи и управление
В Т2 встроенно три аккумулятора. Один в зарядном футляре и по одному в каждом наушнике. Аккумулятор внутри кейса используется для зарядки наушников, а входящий в комплект USB-кабель Type-C используется для зарядки кейса.
Перед первым использованием Т2
⚠️ Sudio T2 поставляется с защитной пленкой, закрывающей зарядные разъемы между наушниками и зарядным чехлом. Удалите пленку чтобы наушники включились.
Зарядка и время проигрывания
Наушники работают до 7,5 часов без подзарядки (6,5 часов в режиме активного шумоподавления), в сумме до 35 часов работы с зарядным футляром, прежде чем потребуется его подзарядка.
Для полной зарядки батареи необходимо примерно 60 минут. T2 также поддерживают функцию быстрой зарядки. До 2 часов воспроизведения после 10 минут зарядки.
Способы зарядки
Заряжайте футляр Т2 только с помощью USB-кабеля Type-C, беспроводная зарядка не поддерживается. Рекомендуем использовать кабель Sudio, входящий в комплект, однако другие сторонние USB-кабели Type-C также могут подойти.
Индикаторы уровня заряда батареи
Есть три светодиодных индикатора, которые показывают оставшийся уровень заряда батарей. Световой индикатор зарядного футляра расположен на задней стороне футляра, под зарядным портом. Индикаторы наушников находятся под сенсорными кнопками управления.
Светодиодные индикаторы загораются, когда наушники подключаются и отключаются от футляра, а также когда остается менее 25% заряда батареи.
Когда зарядный кабель вставлен в футляр, текущий уровень заряда батареи отображается в течение 5 секунд, а затем мигает свет, указывая на то, что чехол заряжается.
В некоторых случаях вы также можете узнать уровень заряда батареи на телефоне, например iPhone или Android. Показанный уровень относится к наушникам T2, а не к зарядному устройству.
Наушники
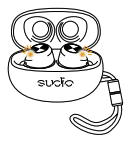
- Белый: осталось 26-100% от заряда батареи
- Оранжевый: осталось 0-25% заряда батареи
Зарядный футляр (кабель не вставлен)
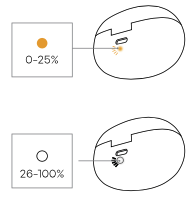
- Белый: осталось 26-100% от заряда батареи
- Оранжевый: осталось 0-25% заряда батареи
Зарядный футляр (со вставленным кабелем во время зарядки)
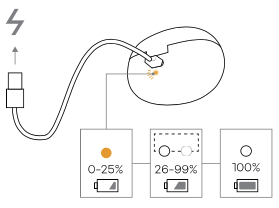
- Белый (фиксированный): аккумулятор заряжен на 100%
- Белый (мигает): аккумулятор заряжен на 26-99%
- Оранжевый: батарея заряжена на 0-25%
T2 - Руководство пользователя - Комфортная посадка
Sudio T2 протестирован на 450 людях, чтобы добиться эргономичного дизайна, который обеспечивает комфорт во время длительных сеансов прослушивания.
Чтобы наушник поместился в ухе, поместите его сенсорной кнопкой наружу и слегка поверните на место.
T2 поставляется с четырьмя сменными силиконовыми амбушюрами размеров XS, S, M и L. Амбушюры размера M уже установлены на наушниках. При необходимости замените их, чтобы подобрать размер, который подойдёт вам.
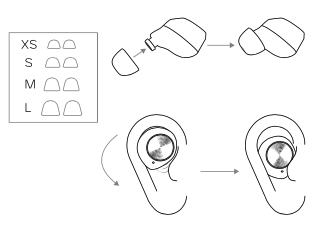
Nio
Как включить/выключить Nio?
Sudio Nio включаются автоматически, когда наушники вынимаются из зарядного футляра и выключаются, когда наушники помещаются в футляр.
Чтобы отключить Sudio Nio, зажмите сенсорную кнопку на наушнике на 6 секунд, пока не услышите "Power off". Чтобы снова включить наушники, вставьте наушники обратно в зарядный футляр и достаньте их заново.
Как использовать сенсорное управление в Nio?
Следуйте инструкции по использованию сенсорного управления в Sudio Nio:
-Контроль музыки-
Одно касание на любом наушнике: пауза или запуск музыки
Двойное касание с правой стороны: переход к следующей песне
Двойное касание с левой стороны: возврат к предыдущей песне
Тройное касание с правой стороны: увеличение громкости
Тройное касание на левой стороне: уменьшение громкости
-Телефонные звонки-
Одно касание на любом наушнике: прием или завершение телефонного звонка
Нажмите и удерживайте сенсор в течение 2 секунд на любом наушнике, чтобы отклонить телефонный звонок
-Включение или выключение наушников-
Нажмите и удерживайте сенсор в течение 6 секунд на любом наушнике, чтобы выключить Sudio Nio
Нажмите и удерживайте сенсор в течение 3 секунд на любом наушнике, чтобы включить наушники.
Как заряжать Nio?
Чтобы зарядить наушники, поместите их обратно в зарядный футляр и убедитесь, что светодиоды наушников и зарядного футляра начинают мигать.
Полная зарядка наушников от зарядного футляра с 0% заряда занимает 90 минут. Однако 15 минут зарядки обеспечивают 1 час проигрывания.
Зарядка наушников и зарядного футляра вместе от 0% заряда занимает 150 минут.
Если в наушниках и в зарядном футляре не осталось заряда, сначала зарядите зарядный футляр без наушников в течение 15 минут. Затем снова вставьте наушники в зарядный футляр, чтобы начать их зарядку. Это сделано для предотвращения циклической перезагрузки Sudio Nio во время зарядки, как следствие они могут работать некорректно. Если это всё-таки произошло, сделайте сброс Nio до заводских настроек.
Посадка у Nio
Наушники Sudio Nio идут с комплектом сменных насадок четырех размеров. Эти сменные насадки с крыльями благодаря которым посадка наушника более универсальна. Если есть ощущение, что посадка не подходит, попробуйте все размеры включенные в комплект.
Как чистить Nio?
Чистите Nio слегка увлажнённой водой тканью. Не используйте спирт, абразивные материалы или химические вещества. Использование чистящих салфеток с химическими веществами грозит повреждением наушников или зарядного чехла.
Nio - Руководство Пользователя (PDF)
Ett
Как подключить Ett к устройству
Чтобы подключить Ett к устройству, выполните следующие действия.
- Войдите в беспроводное соединение через настройки вашего устройства. Включите беспроводное соединение. Если оно уже включено, обязательно «обновите» его, выключив, а затем снова включив.
- Выньте оба наушника из зарядного футляра.
- Ett автоматически перейдет в режим подключения и индикатор на наушниках будет мигать красным и белым.
- Выберите «Sudio Ett» в списке устройств для подключения.
- Теперь Ett подключён к устройству и можно наслаждаться музыкой.
Если вы хотите использовать только один из наушников, просто выньте из зарядного футляра тот, который хотите использовать.
За что отвечает кнопка на наушнике?
Управляйте различными функциями с помощью кнопки, на любом наушнике Ett.
- Музыка -
Одно нажатие: пауза или воспроизведение звучания
Два нажатия: переход к следующему треку
Три нажатия: вернуться к предыдущему треку
- Телефонные звонки -
Одно нажатие: прием или завершение телефонного звонка
Нажмите и удерживайте в течение 2-х секунд для отклонения телефонного звонка
- Включение или выключение наушников -
Нажмите и удерживайте кнопку в течение 6 секунд, чтобы выключить наушники.
Выключить Ett можно только зажатием кнопки на 6 секунд.
Чтобы включить Ett, положите наушники обратно в зарядный чехол и достаньте их заново.
-Включение или выключение активного шумоподавления (ANC) -
Нажмите и удерживайте кнопку в течение 2-х секунд
Ett работает некорректно. Что делать?
Если Ett работает некорректно или возникли проблемы с сопряжением, выполните следующие действия.
- Выключите беспроводное соединение на устройстве.
- «Забудьте» Sudio Ett в списке устройств. Ett больше не синхронизируется с устройством. Если Ett подключён к нескольким устройствам, забудьте об Ett на всех устройствах.
- Вставьте оба наушника обратно в футляр.
- Извлеките левый наушник из футляра, нажмите кнопку на левом наушнике 8 раз, оставьте его вне футляра.
- Теперь выньте правый наушник, нажмите кнопку на правом наушнике 8 раз.
- Оба наушника начнут быстро мигать красным и белым. Нажмите кнопку на обоих наушниках два раза.
- Сброс настроек Ett к заводским настройкам завершён. Подключите Ett к устройству.
Если не знаете, как подключить Ett к устройству, ознакомьтесь с этой статьей "Как подключить Ett к устройству"
Как проверить заряд батареи в Ett?
- Проверка заряда наушников -
Проверьте оставшийся заряд батареи наушников Ett в телефоне.
На устройстве iOS значок заряда батареи расположен в правом верхнем углу экрана.
На устройстве Android значок заряда аккумулятора расположен на экране, а также загрузить любое приложение для аккумулятора, чтобы проверить время автономной работы Ett.
- Проверка заряда футляра -
Светодиодные индикаторы на футляре показывают уровень его заряда. Они загораются при вынимании наушников и сразу после того, как наушники помещены обратно в зарядный чехол.
Уровень заряда батареи 75% - 100%: загораются все четыре индикатора
Уровень заряда батареи 50% - 75% : загораются три индикатора
Уровень заряда батареи 25% - 50%: загораются два индикатора
Уровень заряда батареи 0% - 25%: загорается один индикатор
Как чистить Ett
Чистите Ett слегка увлажнённой водой тканью. Не используйте спирт, абразивные материалы или химические вещества. Использование чистящих салфеток с химическими веществами грозит повреждением наушников или зарядного чехла.
Ett - Руководство Пользователя (PDF)
Fem
Fem - Руководство Пользователя (PDF)
Tolv
Смена трека
Чтобы перейти к следующей песне, быстро нажмите кнопку справа дважды. Чтобы вернуться к предыдущей песне, быстро нажмите кнопку слева дважды.
В некоторых приложениях, чтобы вернуться к предыдущей песне, необходимо переключить трек прямо в приложении.
Tolv - Руководство Пользователя (PDF)
Tolv R
Смена трека
Чтобы перейти к следующей песне, быстро нажмите кнопку справа дважды. Чтобы вернуться к предыдущей песне, быстро нажмите кнопку слева дважды.
В некоторых приложениях, чтобы вернуться к предыдущей песне, необходимо переключить трек прямо в приложении.
Tolv R - Руководство Пользователя (PDF)
Femtio
Как подключить Femtio к устройству
- Войдите в функцию беспроводного подключения в настройках устройства. Включите его. Если он уже включен, обязательно «обновите», выключив беспроводное соединение, а затем снова включив его.
- Включите Femtio, удерживая кнопку питания в течение 2 секунд. Femtio автоматически перейдет в режим сопряжения, и крайний правый индикатор начнет быстро мигать белым.
- Выберите «Sudio Femtio» в списке устройств для подключения.
- После подключения индикатор будет мигать белым каждые 3 секунды. Femtio готов к использованию.
Как включить или выключить Femtio
Чтобы включить или выключить Femtio, нажмите и удерживайте кнопку питания в течение 2 секунд.
Femtio работает некорректно. Что делать?
Если динамик работает некорректно или возникли проблемы с сопряжением, выполните сброс до заводских настроек. Перед началом, проверьте серийный номер продукта на задней стороне упаковки динамика рядом со штрих-кодом. Серийные номера представляют собой последовательность цифр, зачастую состоящую из 11 цифр. После проверки серийного номера выполните действия, соответствующие вашей модели.
<Если ваш серийный номер начинается с 31 или 503, выполните сброс к заводским настройкам>
- Войдите в функцию беспроводного соединения и «забудьте» о Femtio в устройствах. Femtio больше не будет синхронизироваться с устройством.
- Выключите динамик.
- Нажмите и удерживайте кнопку питания в течение 10 секунд.
- Теперь Femtio сброшен до заводских настроек. Включите динамик, чтобы выполнить сопряжение устройства, следуя шагу «Как подключить Femtio к другому устройству.»
<Если ваш серийный номер начинается с других цифр, выполните сброс настроек к заводским настройкам>
- Нажмите одновременно кнопку беспроводное соединение и кнопку минус « - » на 3 секунды.
- Теперь Femtio сброшен до заводских настроек. Включите динамик, чтобы выполнить сопряжение устройства, следуя шагу «Как подключить Femtio к другому устройству.»
Как проверить время автономной работы?
Чтобы проверить уровень заряда аккумулятора Femtio, нажмите кнопку питания один раз. Прямо над логотипом "SUDIO" расположены 5 светодиодных индикаторов. 4 светодиодных индикатора с левой стороны показывают состояние аккумулятора Femtio.
75% - 100% уровень заряда батареи: горят все четыре белых индикатора
50% - 75% уровень заряда батареи: горят три белых индикатора
Уровень заряда батареи 25% - 50%: горят два белых индикатора
Уровень заряда менее 25%: горит один белый индикатор
Чрезвычайно низкий уровень заряда батареи: мигает один красный индикатор
Как чистить Femtio
Чистите Femtio слегка увлажнённой водой тканью. Не используйте спирт, абразивные материалы или химические вещества для чистки динамика.
Femtio - Руководство Пользователя (PDF)
Elva
Как включить и подключить Sudio Elva к моему телефону?
Чтобы включить Sudio Elva и выполнить сопряжение с устройством, следуйте инструкции.
1. Включите беспроводное соединение на вашем устройстве.
2. Нажмите среднюю кнопку на 5 секунд. После звукового оповещения «Power on», продолжайте удерживать среднюю кнопку, пока не услышите звуковой сигнал и «Pairing» и Sudio Elva перейдет в режим сопряжения.
3. Найдите «Sudio Elva» в списке устройств.
4. Щелкните «Sudio Elva» в списке.
5. Теперь Sudio Elva сопряжены с устройством.
Как выключить Elva?
Нажмите и удерживайте среднюю кнопку примерно 5 секунд, пока не услышите «Power off».
Sudio Elva работает некорректно. Что делать?
Если Sudio Elva работает некорректно, выполните сброс настроек до заводских, чтобы удалить текущие настройки и сопряжения. Следуйте инструкции чтобы снова подключить Sudio Elva к устройству.
- Выключите беспроводное соединение на своем устройстве.
- «Забудьте» о наушниках в списке беспроводного соединения. Sudio Elva больше синхронизируется с устройством. Если Sudio Elva подключено к нескольким устройствам, забудьте о Sudio Elva на всех устройствах.
- Одновременно зажмите кнопки с каждой стороны и удерживайте в течение 5 секунд.
- Сброс настроек Sudio Elva к заводским настройкам завершён. Подключить Sudio Elva к устройству заново.
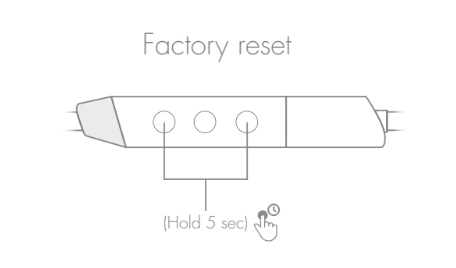
Как зарядить Elva?
Заряжайте Sudio Elva с помощью кабеля USB-A - C, входящего в комплект, либо сняв часть панели управления, с 3 кнопками и подключив напрямую к ПК или ноутбуку.
Elva - Руководство Пользователя (PDF)
Насколько водонепроницаема Elva?
Рейтинг IPX 5 не даёт гарантии, что наушники будут продолжать работать в полную силу после таких действий, как плавание или принятие душа с ними.Sudio Elva - устройство с уровнем защиты iPX5, наушники являются водонепроницаемыми. На этом уровне наушники могут выдерживать воздействие струи воды под низким давлением. IPX это официальный рейтинг, оценка проведена сторонней организацией. Sudio Elva также полностью защищены от пота и влаги.
Рейтинг IPX 5 не даёт гарантии, что наушники будут продолжать работать в полную силу после, как пример, плаванья или принятия душа с ними.
Vasa Blå
Смена трека
Нажмите и удерживайте кнопку плюс (+) на пульте дистанционного управления или наушниках в течение 2 секунд, чтобы перейти к следующей песне.
Нажмите и удерживайте кнопку минус (-) на пульте дистанционного управления или наушниках в течение 2 секунд, чтобы перейти к последней песне.
Как узнать, сколько заряда осталось на моем устройстве Vasa Blå?
Срок службы батареи будет отображаться на вашем смартфоне.
Поскольку разные производители телефонов используют разные операционные системы Android, вы всегда можете загрузить приложение для батареи в магазине Google Play, чтобы просмотреть там время автономной работы наушников.
Мигающий красный свет означает, что батарея разряжена.
Vasa Blå - Руководство Пользователя (PDF)
Заряда батареи - Vasa Blå
Если красный индикатор не загорается при подключении к зарядному устройству, есть вероятность, что проблема с аккумулятором, зарядном шнуре или зарядном порте.
Тестирование:
- Убедитесь, что вы используете зарядный кабель Sudio.
- Убедитесь, что кабель полностью вставлен в наушники и что пыль или грязь не блокируют порт.
- Попробуйте получить питание от другого источника, например, от USB-порта ноутбука или от розетки.
- Попробуйте использовать другой кабель micro USB, если он у вас есть.
Примечание:
Индикатор заряда батареи на телефоне показывается с шагом в 20%. Соответственно 100, 80, 60 и т. Д
Могу ли я активировать Siri или Google Assistant через Vasa Blå?
Одновременно нажмите среднюю и верхнюю кнопки (звук +).
Чтобы отключить голосовой помощник, снова нажмите две кнопки одновременно
Tre/Tretton
Смена трека
Нажмите и удерживайте кнопку плюс (+) на пульте дистанционного управления или наушниках в течение 2 секунд, чтобы перейти к следующей песне.
Нажмите и удерживайте кнопку минус (-) на пульте дистанционного управления или наушниках в течение 2 секунд, чтобы перейти к последней песне.
Как узнать, сколько заряда осталось на моем устройстве Tre/Tretton?
Срок службы батареи будет отображаться на вашем смартфоне.
Поскольку разные производители телефонов используют разные операционные системы Android, вы всегда можете загрузить приложение для батареи в магазине Google Play, чтобы просмотреть там время автономной работы наушников.
Мигающий красный свет означает, что батарея разряжена.
Tre/Tretton - Руководство Пользователя (PDF)
Заряда батареи - Tre/Tretton
Если красный индикатор не загорается при подключении к зарядному устройству, есть вероятность, что проблема с аккумулятором, зарядном шнуре или зарядном порте.
Тестирование:
- Убедитесь, что вы используете зарядный кабель Sudio.
- Убедитесь, что кабель полностью вставлен в наушники и что пыль или грязь не блокируют порт.
- Попробуйте получить питание от другого источника, например, от USB-порта ноутбука или от розетки.
- Попробуйте использовать другой кабель micro USB, если он у вас есть.
Примечание:
Индикатор заряда батареи на телефоне показывается с шагом в 20%. Соответственно 100, 80, 60 и т. Д
Могу ли я активировать Siri или Google Assistant через Tre/Tretton?
Одновременно нажмите среднюю и верхнюю кнопки (звук +).
Чтобы отключить голосовой помощник, снова нажмите две кнопки одновременно
Tio
Смена трека
Нажмите и удерживайте кнопку плюс (+) на пульте дистанционного управления или наушниках в течение 2 секунд, чтобы перейти к следующей песне.
Нажмите и удерживайте кнопку минус (-) на пульте дистанционного управления или наушниках в течение 2 секунд, чтобы перейти к последней песне.
Как узнать, сколько заряда осталось на моем устройстве Tio?
Срок службы батареи будет отображаться на вашем смартфоне.
Поскольку разные производители телефонов используют разные операционные системы Android, вы всегда можете загрузить приложение для батареи в магазине Google Play, чтобы просмотреть там время автономной работы наушников.
Мигающий красный свет означает, что батарея разряжена.
Tio - Руководство Пользователя (PDF)
Заряда батареи - Tio
Если красный индикатор не загорается при подключении к зарядному устройству, есть вероятность, что проблема с аккумулятором, зарядном шнуре или зарядном порте.
Тестирование:
- Убедитесь, что вы используете зарядный кабель Sudio.
- Убедитесь, что кабель полностью вставлен в наушники и что пыль или грязь не блокируют порт.
- Попробуйте получить питание от другого источника, например, от USB-порта ноутбука или от розетки.
- Попробуйте использовать другой кабель micro USB, если он у вас есть.
Примечание:
Индикатор заряда батареи на телефоне показывается с шагом в 20%. Соответственно 100, 80, 60 и т. Д
Могу ли я активировать Siri или Google Assistant через Tio?
Одновременно нажмите среднюю и верхнюю кнопки (звук +).
Чтобы отключить голосовой помощник, снова нажмите две кнопки одновременно
Regent/Regent II
Беспроводное подключение - Regent/Regent II
- Войдите в функцию беспроводного подключения в настройках вашего устройства. Включите беспроводное подключение. Если беспроводное подключения уже активно, обязательно «обновите», выключив, а затем снова включив его.
- Удерживайте среднюю кнопку наушников 5-8 секунд. Первая вспышка синего цвета означает, что ваши наушники включены. НЕ ОТПУСКАЙТЕ и продолжайте нажимать кнопку. Затем вы увидите красную вспышку - это означает, что наушники готовы к сопряжению с вашим устройством.
- В настройках беспроводного подключения вы увидите «Sudio Regent» в списке - нажмите «Подключиться».
- После подключения наушники будут мигать синим каждые 8 секунд или около того.
- Теперь вы можете использовать наушники!
- Чтобы выключить наушники, удерживайте среднюю кнопку около 3 секунд. Он будет мигать красным, это означает, что наушники выключены.
Вдруг не могу подключиться:
- Перейдите к функции беспроводного подключения в настройках вашего устройства.
- Найдите «Sudio Regent» в списке беспроводное подключение. Нажмите значок «« ⓘ »» (для iPhone), а затем нажмите «забыть это устройство» или, если это Android устройство, нажмите удалить.
- Выключите беспроводное подключение и перезагрузите устройство. Когда ваше устройство включено, снова включите беспроводное подключение.
- Держите наушники как можно ближе к устройству. Удерживайте среднюю кнопку наушников 5-8 секунд. Первая вспышка синего цвета означает, что ваши наушники включены. НЕ ОТПУСКАЙТЕ и продолжайте нажимать кнопку. Затем вы увидите красную вспышку - это означает, что наушники готовы к сопряжению с вашим устройством.
- В настройках беспроводного подключения вы увидите «Sudio Regent» в списке - нажмите «Подключиться».
Смена трека
Нажмите и удерживайте кнопку плюс (+) на пульте дистанционного управления или наушниках в течение 2 секунд, чтобы перейти к следующей песне.
Нажмите и удерживайте кнопку минус (-) на пульте дистанционного управления или наушниках в течение 2 секунд, чтобы перейти к последней песне.
Как узнать, сколько заряда осталось в наушниках?
Срок службы батареи будет отображаться на вашем смартфоне.
Поскольку разные производители телефонов используют разные операционные системы Android, вы всегда можете загрузить приложение для батареи в магазине Google Play, чтобы просмотреть там время автономной работы наушников.
Мигающий красный свет означает, что батарея разряжена.
Regent - Руководство Пользователя (PDF)
Могу ли я активировать Siri или Google Assistant через Regent/Regent II?
Активируйте Siri на вашем устройстве. Вы можете дать команду «HEY SIRI» через микрофон наушника после активации Siri на устройстве.
Klar
Беспроводное соединение - Klar
- Войдите в настройки вашего устройства. Включите беспроводное соединение. Если оно уже включено, обязательно «обновите», выключив, а затем снова включив его.
- Удерживайте среднюю кнопку наушников 5-8 секунд. Первая вспышка синего цвета означает, что ваши наушники включены. НЕ ОТПУСКАЙТЕ и продолжайте нажимать кнопку. Затем вы увидите красную вспышку - это означает, что наушники готовы к сопряжению с вашим устройством.
- В настройках беспроводного подключения вы увидите «Sudio Klar» в списке - нажмите «Подключиться».
- После подключения наушники будут мигать синим каждые 8 секунд или около того.
- Теперь вы можете использовать наушники!
- Чтобы выключить наушники, удерживайте среднюю кнопку около 3 секунд. Он будет мигать красным, это означает, что наушники выключены.
Вдруг не могу подключиться:
- Перейдите к функции беспроводного подключения в настройках вашего устройства.
- Найдите «Sudio Klar» в списке беспроводных устройств. Нажмите значок «« ⓘ »» (для iPhone), а затем нажмите «забыть это устройство» или, если это Android устройство, нажмите удалить.
- Выключите беспроводное подключение и перезагрузите устройство. Когда ваше устройство включено, снова включите беспроводное подключение.
- Держите наушники как можно ближе к устройству. Удерживайте среднюю кнопку наушников 5-8 секунд. Первая вспышка синего цвета означает, что ваши наушники включены. НЕ ОТПУСКАЙТЕ и продолжайте нажимать кнопку. Затем вы увидите красную вспышку - это означает, что наушники готовы к сопряжению с вашим устройством.
- В настройках беспроводного подключения вы увидите «Sudio Klar» в списке - нажмите «Подключиться».
Смена трека
Нажмите и удерживайте кнопку плюс (+) на пульте дистанционного управления или наушниках в течение 2 секунд, чтобы перейти к следующей песне.
Нажмите и удерживайте кнопку минус (-) на пульте дистанционного управления или наушниках в течение 2 секунд, чтобы перейти к последней песне.
Как узнать, сколько заряда осталось в наушниках?
Срок службы батареи будет отображаться на вашем смартфоне.
Поскольку разные производители телефонов используют разные операционные системы Android, вы всегда можете загрузить приложение для батареи в магазине Google Play, чтобы просмотреть там время автономной работы наушников.
Мигающий красный свет означает, что батарея разряжена.
Klar - Руководство Пользователя (PDF)
Могу ли я активировать Siri или Google Assistant через Klar?
Активируйте Siri на вашем устройстве. Вы можете дать команду «HEY SIRI» через микрофон наушника после активации Siri на устройстве.
Flyg
Что такое Sudio Flyg?
Sudio Flyg - это беспроводной адаптер подключающий Sudio Elva к аналоговым аудио устройствам. Он содержит передатчик, который превращает аудио сигнал с устройств с разъемом для наушников в 3,5 мм в сигнал. Sudio Flyg воспроизводит музыку с таких устройств, как старые аудио плееры, приставки и телевизионные экраны в самолётах.
Как взаимодействуют Flyg с Elva?
Выполните сопряжение Sudio Elva с Sudio Flyg. Как сопряжение закончено, подключите Sudio Flyg к аудио устройству. Следуйте инструкциям ниже.
- Убедитесь, что рядом нет беспроводного, активированного устройства, чтобы Sudio Flyg не подключился к неверному устройству.
- Нажмите и удерживайте круглую кнопку на Sudio Flyg (рисунок ниже) в течение 5 секунд, пока светодиодный индикатор не начнет мигать белым.
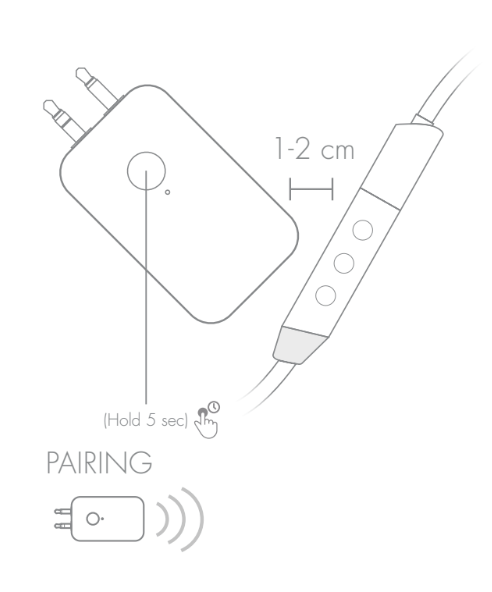
- Включите Sudio Elva и войдите в режим сопряжения, зажав среднюю кнопку на 7 секунд.
- Держите Sudio Elva близко (1-2 см) к Flyg.
- Как только светодиодный индикатор на Sudio Flyg перестал мигать, это значит, Sudio Elva подключён к Sudio Flyg.
- Подключите Sudio Flyg к устройству, к которому необходимо подключить Sudio Elva. Если доступен только один выход, используйте главный вывод.
- Устройство и Sudio Elva подключены.
Как включить / выключить Flyg?
Зажмите и удерживайте кнопку примерно 5 секунд, пока светодиод не начнёт гореть постоянно. Он автоматически выключится через некоторое время, если поблизости нет источника сигнала или наушники не сопряжены.
Flyg работает некрорректно. Что делать?
Если Sudio Flyg работает некорректно или возникли проблемы с подключением наушников к Sudio Flyg, выполните сброс настроек до заводских, чтобы удалить текущие настройки и данные сопряжения. Быстро нажмите кнопку на Sudio Flyg 3 раза, чтобы сбросить настройки.
Как проверить состояние заряда батареи в Flyg?
Нажмите кнопку на Sudio Flyg один раз, чтобы увидеть текущий статус батареи.
Заряд батареи 50% - 100% : индикатор не горит.
Заряд батареи 10% до 50%: индикатор мигает красным и белым.
Заряд батареи менее 10%: индикатор остается красным.
Flyg - Руководство Пользователя (PDF)